Understanding the Importance of a Positive Mindset
Why Mindset Matters in Disasters
Let me tell you, the way we think can seriously shape our experience, especially during disasters. When we approach these situations with a positive mindset, we’re not just coping; we’re thriving. Trust me, in the midst of chaos, a good attitude can help us assess risks more effectively and make better decisions. Every time I found myself in a tough spot, my mindset drastically changed the way I handled it.
A positive mindset gives us the strength to face challenges head-on. Instead of panic, we have clarity; instead of feeling overwhelmed, we feel equipped. It’s like having a mental shield that protects us from fear and dread. So, genuinely, if you want to be ready for anything, the first step is nurturing that positive attitude.
This isn’t just fluff; it’s about real, practical stuff. When chaos strikes, if you’ve trained your mind to look for silver linings, you’ll discover solutions faster. You’ll be receptive to help, and your resilience will shine. I’ve seen it happen time and time again; the people who mentally prepared were often the ones who could pivot and adapt the quickest.
Building Resilience through Preparation
What Does Preparedness Look Like?
Now, let’s dive into preparedness. I can’t stress enough how important it is to actually have a plan in place. It’s not just about putting together a disaster kit and calling it a day. Nope! Preparing means thinking through every aspect of how you and your loved ones will respond when the unexpected happens.
I remember once being caught off guard during a storm when I realized my emergency supplies weren’t where I thought they were. That taught me a valuable lesson about being organized! So, I suggest making a checklist, and regularly reviewing it to keep everything in order. It’s a game changer.
And don’t forget to involve your family or friends in your preparedness planning! It’s a bonding experience, plus everyone should know what to do when things get tough. I made it a fun family activity to gather supplies while joking around about what snacks we’d want in a crisis. Preparedness doesn’t have to be all serious; make it enjoyable!
Cultivating a Support System
The Power of Community
Here’s the deal: going through tough times is a lot easier when you’ve got a strong support system. I know from experience that surrounding yourself with positive, proactive friends and family can lift you up just when you need it. They can help you stay grounded and encourage you to focus on solutions rather than dwelling on problems.
Your community can provide different perspectives and ideas you might not have thought of. Plus, having someone to share in your stress makes it a whole lot lighter, right? Just knowing there’s someone out there who’s got your back means a lot when the going gets tough.
On a practical level, consider joining local groups focused on disaster preparedness. I once joined a local CERT (Community Emergency Response Team) group, and it was hugely beneficial! Not only did I gain knowledge, but I also connected with an amazing community of like-minded individuals. Together, we exchanged tips, helped each other prepare, and even formed lasting friendships.
Practicing Positive Affirmations and Visualization
Reframing Your Inner Dialogue
Let’s get into something deeply personal: the art of positive affirmations. I actually started incorporating these little gems into my daily routine, and wow, did they work wonders! Speaking kind words to myself, especially during stressful situations, has genuinely helped me face adversity with a better outlook.
It may sound cheesy, but it’s effective. Every morning, I’d look in the mirror and say phrases like “I’m capable,” “I’m prepared,” and “I can handle anything”—and let me tell ya, those affirmations became a part of me! They’ve created a firm foundation that sustained me throughout various challenges.
Visualization is another technique that’s been a total lifesaver for me. I often imagine myself navigating through a disaster scenario calmly and effectively. This mental exercise gets me ready for the worst case while keeping my spirits high. It’s surreal how visualizing success can help me feel more confident when faced with real-life challenges.
Adapting and Learning from Experiences
Embracing Flexibility
Life doesn’t always go as planned, especially during disasters. That’s why embracing flexibility and adaptation has been crucial for my personal growth. I’ve learned that instead of getting frustrated when my plans fall through, I should embrace the chaos as an opportunity to learn and grow.
For instance, after a natural disaster impacted my town, the resilience I built allowed me to not only adapt personally but also to aid others in need. Turning challenges into learning experiences has ultimately made me stronger. If something goes wrong, I now ask myself, “What can I learn from this?” and “How can I improve next time?”
By keeping an open mind, I’ve been able to adjust my approaches and strategies based on past experiences. Plus, sharing what I learned with others fosters a culture of positivity and support in my community. Life’s too short to stay stuck in rigid ways; let’s embrace the changes instead!
FAQs
What is the core message of building a positive mindset for disaster readiness?
The core message is that a positive mindset can significantly impact how effectively you handle disasters. By nurturing positivity, you enhance your resilience and problem-solving abilities in crisis situations.
How can I prepare my family for potential disasters?
You can prepare your family by creating an emergency plan together, gathering supplies, and regularly reviewing important information. Making it a fun, engaging process can enhance teamwork.
Why is community support critical during disasters?
Community support is critical because it provides emotional strength, insight, and practical help during tough times. Having a reliable network can make the burden lighter and facilitate quicker recovery.
What role do positive affirmations play in disaster preparedness?
Positive affirmations help build self-confidence and maintain a hopeful mindset. They can help you frame your thoughts positively, especially in the face of adversity, which can improve your response to stress.
How can I learn from past disaster experiences?
Reflect on what worked and what didn’t, and always seek out lessons from each experience. Keeping an open mind to adaptability will allow you to adjust your strategies in future situations.
In an unpredictable world, being ready for anything is not just a wise choice; it’s a necessity. Emergencies can strike without warning, and understanding how to prepare can make all the difference when seconds count. This guide will equip you with essential knowledge on emergency preparedness.
## Understanding the Different Types of Emergencies: Are You Prepared?
Emergencies come in various forms, each with unique risks and challenges. Natural disasters such as hurricanes, earthquakes, floods, and wildfires are some of the most common. However, man-made emergencies like chemical spills or active shooter situations also pose significant threats. It’s crucial to assess your environment and identify potential hazards specific to your location. For instance, those living in coastal areas might prioritize hurricane readiness while residents in urban settings may need to focus on different threats. Understanding these distinctions helps you tailor your preparedness strategy effectively.
## Creating Your Emergency Plan: Steps to Safety
Once you’ve identified potential emergencies, it’s time to create a robust emergency plan. Start by discussing the plan with everyone in your household—clear communication is key! Outline escape routes from your home and establish designated meeting points where everyone can regroup after evacuating. Consider adding contact information for family members and local emergency services.
Additionally, ensure that everyone knows how to turn off utilities like gas and water if necessary. Practice this plan regularly so that everyone feels confident navigating it under pressure. Remember, a well-rehearsed plan can save lives during actual emergencies!
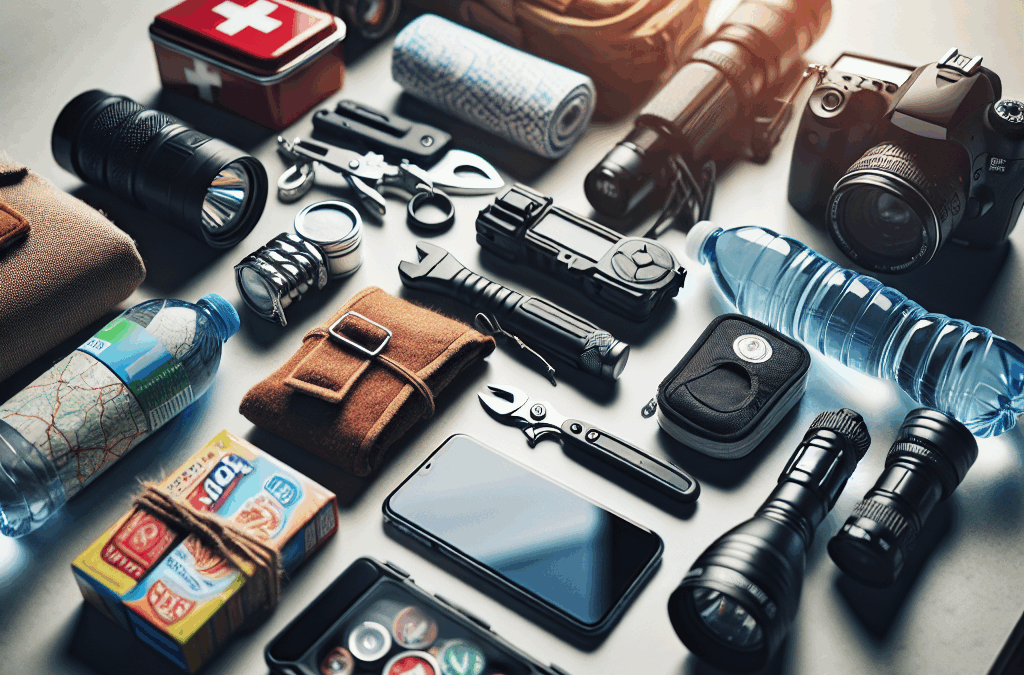
## Building Your Emergency Kit: Essentials for Every Household
An emergency kit is a lifeline during crises—having one ready ensures you’re prepared for any situation that may arise. Start by gathering basic supplies: water (one gallon per person per day for at least three days), non-perishable food items (enough for at least three days), first-aid supplies, flashlights, batteries, multi-tools or Swiss knives, hygiene products including hand sanitizer and wet wipes, and important documents stored in waterproof containers.
Don’t forget about special needs! If you have infants or elderly family members, include baby formula or medications required for chronic conditions. Personalize your kit based on individual needs while ensuring it’s easily accessible at all times.
## Staying Informed: The Importance of Communication and Resources
Knowledge is power when it comes to emergencies! Staying informed about local weather alerts or community resources greatly enhances your readiness level. Invest in a battery-operated NOAA Weather Radio to receive real-time updates even when other communication channels fail.
Moreover, incorporate technology into your preparedness strategy—download emergency apps that provide alerts tailored to your area’s risks or connect with community organizations focused on disaster response efforts. Keeping lines of communication open among neighbors can foster mutual support during times of crisis.
## Practicing Your Preparedness: Drills and Community Involvement
Preparedness doesn’t end with planning; practicing regularly reinforces skills learned through drills—both at home and within the community! Schedule monthly family drills simulating various scenarios so everyone knows what steps to take when faced with an emergency.
Engage with local organizations specializing in disaster relief or preparedness initiatives; many offer workshops designed to educate residents on effective strategies during various crises. Not only does this build personal confidence but strengthens community ties as well—a collective effort towards safety makes us all more resilient.
By following these guidelines outlined above—from understanding types of emergencies through practicing preparedness—you’ll be well-equipped should disaster strike unexpectedly! Stay proactive today; tomorrow’s peace of mind depends on it!
One of my absolute favorite escapes from the hustle and bustle of city life is hitting the local parks. Imagine this: it’s a Saturday afternoon, and instead of being cooped up in your small apartment, you’re surrounded by the lush greens and sounds of birds chirping. Parks often have hidden trails that let you immerse yourself in nature without needing to drive too far. They can be a breath of fresh air—literally!
Here’s a tip: I like to pack a little picnic, grab a book, or even my favorite podcast, and just chill for a bit. The best parks have spots where you can really unwind, often with picnic tables or benches just waiting for you to plop down and enjoy a sunny day.
If you’re lucky enough to live near a botanical garden, make sure to check it out. They usually have themed garden sections—think tropical, desert, or butterfly gardens! They provide a mini-vacation right where you live.
Day Trips to Nearby Trails
If you’re itching for some adventure, why not take a day trip to nearby hiking trails? I’ve discovered that sometimes you can find a trail just a short drive away from urban chaos. It’s amazing how quickly you can escape the noise and find yourself in a completely different world, one filled with stunning vistas and fresh air.
A friend of mine always says that the best views come after the hardest climbs. And while that sounds cliché, she’s absolutely right! Once you get to the top of a trail, the satisfaction of taking in those breathtaking views makes all the effort worthwhile.
Plus, hitting the trails is a great way to work out while having fun. Whether you’re solo or in a group, there’s something rejuvenating about being out in nature. Just don’t forget to pack plenty of water and snacks!
Beach Escapes
No city escape plan is complete without a trip to the beach, am I right? The sound of waves crashing and the warmth of the sun are the best kind of refreshment. I love the feeling of sand between my toes while soaking in those rays. Whether it’s a quick drive to a nearby coastline or a longer adventure, there’s just something so freeing about the beach.
What’s great about the beach is that it caters to everyone. Are you a sunbather? Grab a towel and soak up the vibes. Prefer something more active? Try beach volleyball or surfing if you’re feeling adventurous!
For me, sunset on the beach is magical. The horizon filled with colors is the perfect way to end a day. Plus, you can bring your friends and make a bonfire to complete the experience. It’s the perfect way to recharge!
Cultural Experiences
Art Galleries and Museums
Sometimes, I need to escape the city’s chaos by diving into art and culture. Art galleries and museums often host exhibitions that can transport you into different worlds. They are great places to contemplate and reflect, away from the daily grind. Plus, a lot of museums offer free entry on certain days, making it easier to enjoy some culture without breaking the bank!
I’d recommend checking out lesser-known galleries too—sometimes they have the most intriguing work. You might just stumble upon an up-and-coming artist whose work resonates with you! Every visit sparks a little light of inspiration.
Pro tip: many museums have cool events like lecture series, workshops, or even social nights. It’s a fab way to meet people who share similar interests!
Local Festivals and Markets
City dwellers often overlook local festivals and markets, but they can be a great escape. I’m talking about community events where you can taste amazing food, listen to live music, and just hang out with folks. It feels like getting a slice of your city’s culture outside your regular four walls.
I’ve had a blast at street fairs—there are always unique crafts, food from different cultures, and live performances. It’s a vibrant experience that brings the community together, which is fulfilling in indescribable ways.
Keep an eye on local announcements and don’t shy away from trying things you wouldn’t normally experience. They often hold workshops in art or cooking, and you could learn something new while mingling with locals.
Historical Walking Tours
Exploring your own city through a historical walking tour can be a surprisingly refreshing escape. I stumbled upon this when a friend suggested it, and boy, was I grateful! Learning about the city’s history and architecture makes you appreciate where you live even more, bringing a whole new perspective to your everyday scenery.
Many cities have guided tours, but a self-guided version can be just as fun, especially when you have an audio guide. There’s something about strolling through iconic sites that helps you disconnect from your daily stresses.
Plus, walking is great exercise. I tend to make a day of it—explore a neighborhood’s history and grab lunch afterward at a local eatery. Combine exploration with a delicious meal, and you’ve got a day well spent!
Outdoor Activities
City Biking
Biking around the city is one of my all-time favorite escapes. There’s a wind-in-your-hair feeling that takes you away from stress. Many cities offer bike-sharing programs, making it easy to rent and ride without the commitment of owning one.
Riding allows me to explore hidden gems in my city, from quaint coffee shops to vibrant murals. It’s also a blast to meet up with friends for a biking adventure. We often plan routes that lead to local parks or popular food spots!
Be sure to pick a bike-friendly city. Some places have bike lanes that make your ride safe and enjoyable, while others may seem daunting. When I’m on my bike, it feels like I’ve found a secret passage that leads me on mini-adventures.
Sports Activities
If biking isn’t your jam, consider joining a local sports league. There’s something about team sports that brings the community together. I’ve played in a few leagues—soccer, softball, and even ultimate frisbee. The camaraderie is fantastic!
Not only do you get exercise, but you also get to meet new people and shake off the day’s stresses on the field. Honestly, it feels less like exercise and more like fun, especially at the post-game hangout where everyone cheers for each other.
And if you’re not keen on competitive sports, many cities have outdoor yoga or fitness classes in community parks—you can stretch it out while soaking in some sunshine.
Camping Expeditions
I know camping can sound daunting for some city dwellers, but it’s one of the ultimate ways to escape! There’s something about a cozy tent under the stars that makes all your worries melt away. I usually grab my essentials and hit up a campsite for the weekend.
When I’m out camping, I love spending time hiking, fishing, or simply enjoying nature. And there’s nothing quite like sitting around a campfire on a cool night. It’s a magical experience to share stories and roast marshmallows with friends.
Even if you’re a newbie to camping, many parks offer cabins or yurts for a comfy night’s sleep. It’s an excellent introduction to the outdoors without sacrificing all your comforts.
Urban Escapes
Coffee Shops and Co-Working Spaces
Sometimes I just need to escape to a cozy coffee shop to recharge. There’s something magical about sipping a latte while typing away or just people-watching. Urban coffee shops often have unique vibes and can be a great spot to enjoy some solitude or catch up with friends.
If you’re working from home, changing your scenery can be a game-changer. Co-working spaces provide a productive vibe without the chaos of your usual surroundings. It can help you boost your creativity and keep you motivated!
Don’t forget that many coffee shops host local events or art showcases in the evenings. It’s a lovely way to spot new artists and connect with your community while enjoying your favorite brew.
Local Bookstores
I love wandering through my local bookstores. There’s something soothing about the smell of books and the hushed atmosphere. While hanging out, you might discover a hidden gem of a read or learn about upcoming local author events!
Many bookstores have cozy seating areas where I can curl up with a good book. It’s a great way to unwind while getting that sensation of being somewhere other than your usual haunts.
Plus, independent bookstores often cultivate a community spirit with book clubs and signings, which allow you to meet people who share your interests. These events can lead you to new friendships and adventures!
Spa Days
If you really want to escape the hustle and bustle, why not treat yourself to a spa day? I’m all about a little pampering now and then, whether that’s a massage, a skincare treatment, or simply relaxing in their saunas.
Spas often offer packages that allow you to spend a whole day indulging in treatments that can help relieve stress. It’s a fabulous way to hit the reset button on life! I guarantee you’ll leave feeling like a whole new person.
And let’s be real, a day dedicated to self-care is a much-needed escape and can recharge your batteries better than anything else. So go ahead and treat yourself—you deserve it!
FAQ
1. What are some quick escape options for city dwellers?
Some great quick escape options include visiting local parks, exploring nearby hiking trails, enjoying beach days, or diving into cultural experiences like galleries and festivals.
2. How can I find hidden gems in my city?
Take the time to explore neighborhoods you don’t usually visit. Check local event boards or social media for community events, as they often showcase local art and culture.
3. Do I need a lot of time to enjoy these escapes?
Nope! Many of these ideas can be enjoyed in just a few hours. Weekend mornings or late afternoons can provide the perfect window for a fresh escape.
4. What should I bring for a day out in nature?
Packing light but efficiently is key! Bring plenty of water, snacks, sunscreen, and if you enjoy reading or podcasts, take your favorite book or headphones along.
5. Can I enjoy these escapes alone?
Absolutely! Many of these activities are perfect solo adventures. Whether it’s a relaxing day at the beach or a quiet morning at a coffee shop, you can unwind your own way.
Let’s face it: nobody plans to get injured, but accidents happen. That’s why having a well-stocked first aid kit in your car is a must. When packing your kit, think about including items like band-aids, antiseptic wipes, gauze, and adhesive tape. It’s like having a mini emergency room at your fingertips!
Also, don’t forget to include over-the-counter meds. Things like pain relievers and allergy medications can save the day if you’re in a pinch. Sometimes, distracted drivers or sudden allergies can turn a day into a nightmare, so being prepared can make all the difference.
Lastly, check your kit regularly. I can’t tell you how many times I’ve found outdated items in my own! Make sure everything is in good condition and replace expired products so you’ll be ready for anything when it counts.
Flashlight and Extra Batteries
Picture this: it’s dark out, you’re on the side of the road, and you can’t see a thing. That’s when a trusty flashlight comes into play. A bright, reliable flashlight can be the knight in shining armor you didn’t know you needed. When choosing one, opt for an LED model; they’re super bright and last forever.
While you’re at it, toss in some extra batteries. The last thing you want is your flashlight dying during a critical moment. A pack of good quality batteries doesn’t take up much space and can save you a whole lot of trouble.
And hey, keep your flashlight easily accessible! There’s no use in having one tucked away in a hidden compartment. I learned the hard way to keep mine right in the glove box for quick access. Trust me, you don’t wanna be fumbling around in the dark.
Roadside Flares
Roadside flares are an old school but gold school kind of tool to have in your kit. They’re perfect for alerting oncoming drivers that you’re stuck. It’s all about safety, right? You don’t want someone to unintentionally zoom by and make a tough situation even worse.
Setting them up is easy. Just light one and place it a safe distance away from your vehicle, and voila, instant signal! This little precaution can give you peace of mind when you’re waiting for help to arrive.
Plus, they can also serve multiple functions—not just alerting others. Feel free to get creative; you can use them to light a small campfire in a pinch! I’ve had a couple of unexpected overnight waits during road trips, and it definitely came in handy.
Basic Tools
Multi-Tool
Let’s talk about the ultimate multi-tool. This handy gadget can really save your bacon. Picture it: you have a wrench, a screwdriver, and even scissors all in one tool. It’s like having a Swiss army knife that you can count on when things go haywire.
Whether you need to tighten a loose battery cable or cut a rope, a multi-tool is versatile enough to handle most little emergencies that arise on the road. I can’t tell you how many times it’s helped me out in sticky situations—it’s definitely one of those “better safe than sorry” items.
Don’t forget to practice using your multi-tool before you need it! Familiarize yourself with all its functions. Trust me, it’s worth it to know how to operate it when you’re in a jam.
Jumper Cables
We’ve all been there—your battery decides to take a nap just when you need it most. Jumper cables are an absolute lifesaver in those situations. When choosing a set, opt for heavy-duty cables that are long enough to reach another car’s battery. You want to be prepared!
Learning how to use them isn’t too hard either. Just respect the color coding; red to red, black to ground. I’ve had my fair share of “oh no” moments, and believe me, knowing how to get my car up and running can save a whole day’s plans.
And hey, it’s even better if you learn how to help others! Jump-starting someone else’s car not only gets them back on the road but can turn into a fantastic conversation starter. You might just make a new friend!
Spare Tire and Jack
A flat tire can be an absolute bummer, but having a spare tire and jack can make all the difference. I always keep my spare in good condition, ensuring it’s properly inflated. You’ll thank yourself later when you can easily swap out that flat!
When it comes to the jack, practicing the process ahead of time can save you a lot of frustration. Knowing the steps and how to operate the jack is just as essential as having one on hand. I remember the first time I had to change a tire—it felt like an obstacle course!
Oh, and don’t forget to check your lug wrench! It won’t do you any good if it’s rusted and won’t budge when you need it. Preventive maintenance goes a long way, and it’s important to ensure that all your tools are in working order.
First Aid and Comfort Supplies
Water and Snacks
Staying hydrated is key when you’re on the road. I always stash a couple of bottles of water in my car. If you’re ever stuck, having water can help keep things calm and collected while you wait for help. Keeping a few snacks in your glove compartment is also a smart move; granola bars or trail mix can provide energy when you need it most.
It’s also a good idea to rotate out snacks and water periodically. Nobody wants to find a half-eaten protein bar from last summer! Keeping everything fresh is crucial to make sure you’re ready for any roadside adventure.
And if you share your vehicle with others, consider their preferences too. Making a small supply stash that everyone enjoys can go a long way; it’s not just about comfort but unity during a journey!
Blanket or Sleeping Bag
You never really think of how chilly it can get while you’re waiting for help, whether it’s summer night or in the middle of winter. Bringing a blanket or sleeping bag is a smart move; it’ll keep you warm and comfortable while you figure out your next move.
Choosing one that’s compact and easy to store is best—they shouldn’t take up too much room. When I step out for a road trip, I always throw a lightweight emergency blanket in the back. It’s amazing how much comfort a little warmth can provide when you’re feeling worried.
Plus, a blanket can double as a picnic blanket or even a makeshift cover if the sun is too hot. Versatility is key with any items in your survival kit, and the blanket comes in clutch for lots of unexpected situations.
Phone Charger
Let’s not underestimate how vital staying connected is. A car phone charger is a game changer, especially if you’re using your phone for navigation or just need to stay in touch with someone. It’s a small investment for a huge sense of safety.
Having a charged phone means you can call for roadside assistance or let someone know where you are if trouble hits. My favorite trick is to get a charger that plugs into both the car and the wall. It’s versatile and keeps my devices ready for action.
Also, think about downloading essential apps for roadside emergencies or even just keeping a list of towing services in your contacts. It’s those little steps that can put your mind at ease when things go south.
Safety Gear
Reflective Vest
A reflective vest is a small piece of gear that can make a big difference when you’re pulled over on the side of the road. Being visible to other drivers is crucial, especially in emergency situations. I keep mine close at hand so that I can easily slip it on if I need to work on my car.
Additionally, it adds a layer of protection. If you’ve ever had to change a tire or look under the hood, you know the last thing you want is to be clipped by passing cars. Staying bright and visible helps you stay safe!
When I wear my reflective vest, I feel a little more empowered, knowing that I’m taking steps to ensure my safety while I’m working. Plus, it’s an easy item to pack and doesn’t take up much space in my kit.
Fire Extinguisher
It might sound a little extreme, but a fire extinguisher is a smart thing to have in your car. In case things heat up under the hood or you witness a small fire, it’s a tool that can make all the difference. Choose a compact, car-rated extinguisher that you can easily access. Keeping safety first, right?
Knowing how to use it is just as important as having one. Familiarize yourself with the acronym PASS: Pull, Aim, Squeeze, and Sweep. This simple guideline can help you remember the steps in an emergency.
Also, keep an eye on the expiration dates. A fire extinguisher will only work if it’s within the recommend usage period, so a quick check every few months is a good idea!
Emergency Whistle
Believe it or not, a simple whistle can be a powerful tool in an emergency. If you were to find yourself in a sticky situation or needing to alert others, it’s louder than your voice and uses far less energy. It’s a must-have as part of your safety gear.
I like to keep mine attached to my glove box, so it’s always within reach. It’s a small item that you can easily forget about, but when the time comes to use it, you’ll be glad you have it at hand. Counting on technology might let you down, but a whistle is reliable and never needs charging!
Plus, it can also be fun for signaling at a picnic or just playing around! You can’t go wrong with adding a little playful aspect into your car survival kit.
FAQ
What items are essential for my car survival kit?
Essential items include a first aid kit, flashlight, jumper cables, snacks, and a reflective vest. It’s all about covering the bases for emergencies!
How often should I check my car survival kit?
I recommend checking your kit every few months to ensure everything is in good condition and up to date, especially food and medical supplies.
Are there any items you think are often overlooked?
Absolutely! People often forget about simple items like a phone charger and a whistle. They’re compact and can really help in emergencies.
Do I really need a fire extinguisher in my kit?
Yes! A fire extinguisher can be crucial if something goes wrong with your engine. It’s a small investment for the peace of mind it provides.
Can I customize my survival kit based on my needs?
Definitely! Personalizing your survival kit to fit your unique needs and travel habits is vital. Add items that make sense for you and your typical journeys.
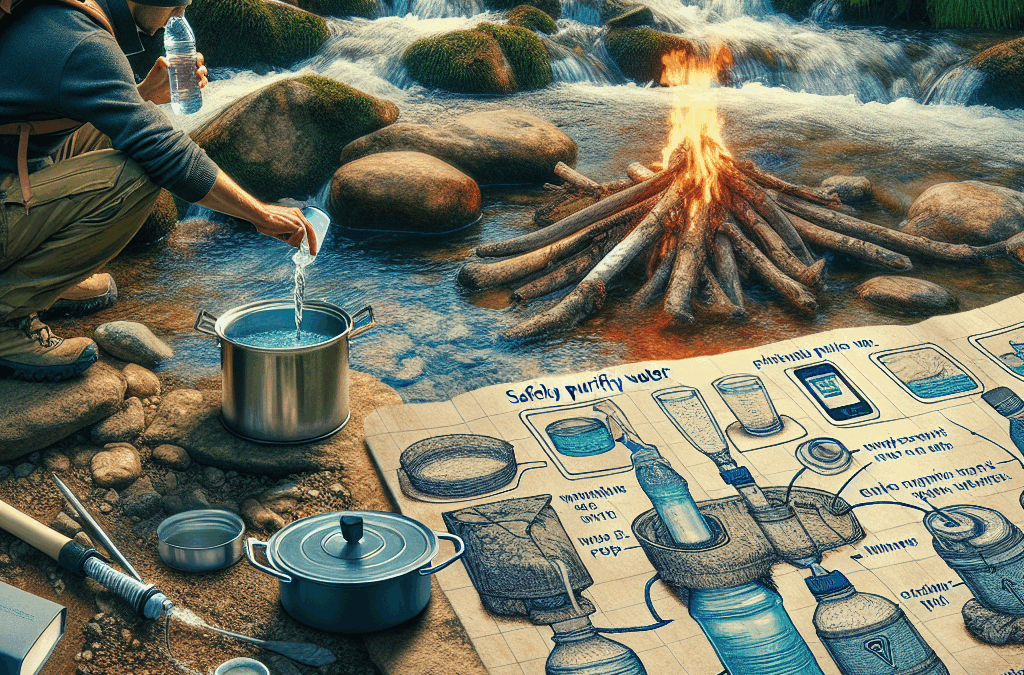
Hey there! So, you’re out in the wild, maybe hiking or camping, and you realize you need water. The good news is that nature provides, but you gotta be smart about it. Let me share what I’ve learned about purifying water in the great outdoors, covering five major methods that can keep you hydrated without getting sick!
Boiling Water
Why Boiling is Effective
Boiling water is one of the oldest and simplest methods, and it always amazes me how straightforward it is. The high temperatures kill off bacteria, viruses, and parasites. Basically, if you bring water to a rolling boil for at least one minute, you’re in the clear. If you’re at higher altitudes, you might wanna crank it up to three minutes just to be safe!
In my experience, I usually look for clear water—it’s a good sign that it’s probably cleaner than murky options, even though it’s not a guaranteed sign. Once I’ve got my water boiling, I’ll wait for a few minutes, and I can usually go back to enjoying the scenery while I wait.
One thing to remember when boiling water: it can take time. If you find yourself in a rush, this method could delay your plans a bit. Just keep your fire going and make sure you have everything set up before you get parched!
How to Boil Safely
Setting up an efficient boiling process is crucial. First up, make sure you’ve got a clean and suitable pot to hold that water, something you can use without worrying about toxins melting into your drink. Camping gear is often designed for this, but if you’re improvising, feel cautiously creative.
Next, keep your fire and the pot steady. Fire tends to just have its own feelings sometimes, especially when the wind kicks in. I always say, find a nice sheltered spot where you can keep the flames going strong.
Lastly, once you’re done, let the water cool before sipping. Trust me; you don’t wanna gulp down boiling hot water and end up with a nasty burn. Patience is key here!
Limitations of Boiling
While boiling is fantastic, it’s not without its limits. First off, it won’t remove chemical contaminants. If your water source is near industrial activities or agricultural areas, boiling might not help much. So it’s important to take a good look at where your water is coming from.
Another thing to keep an eye on is that boiling can use up precious firewood. If you’re in a spot where resources are limited, you might want to save that energy for cooking or warming up instead.
Lastly, don’t forget about the taste! Some folks find boiled water can taste a bit flat. You can always let it cool and add a bit of flavor if that’s your thing. A pinch of salt or some herbs might make your hike a bit more enjoyable!
Using Water Filters
The Benefits of Filtering
Water filters are arguably one of my go-to tools when I’m out exploring. They’re portable, usually lightweight, and super efficient. Filters can remove a range of contaminants, including sediment and bacteria. Plus, they often improve the taste of your water—definitely a bonus after a long day of hiking!
When I use my filter, I love how easy it is. Just scoop up your water and let it pass through. It’s like magic! Many personal filters can handle a surprising amount of water before needing replacement, which is a game-changer for those longer trips.
It’s essential to know that not all filters are created equal, though. Some are designed for wilderness conditions, while others are more suited for treating water that is already relatively clean. So definitely do your homework on what you’re buying!
Setting Up Your Filter
Setting up a filter is usually straightforward. I generally start by checking my filter’s instructions (not the most fun part, I admit!). It’s important to know how to assemble and use it properly so you don’t find yourself in a bind.
You’ll want to attach it to your water container or drink directly from the outlet if you can. I have found that there’s some finesse involved; make sure there are no leaks to avoid wasting good water. Once you’re set up, just collect the water as per the guidelines!
Don’t forget to clean your filters after use; they can get clogged up quickly if you don’t. Keep them washed and stored properly for your next adventure to keep them in tip-top shape.
Potential Downsides of Filters
While handy, filters can have their downsides too. For starters, they generally don’t handle chemicals or heavy metals well, which is another reason to keep an eye on your water source. Depending on your location, you may still catch a nasty illness.
Also, filters can be finicky. If you don’t maintain them, they can jam, leading to a frustrating experience when you’re in a pinch. I’ve had to deal with a slow filter before—talk about an exercise in patience!
Lastly, while many are lightweight, carrying a filter along with all your other gear can add extra ounces to your pack. Just keep that in mind when you’re packing for your trip!
Treating Water with Chemical Purification
Understanding Chemical Purification
Chemical treatments like iodine or chlorine tablets are lifesavers. They’re lightweight and simple to use—just pop one in a bottle of water and wait. I love how efficient they are, especially when I’m carrying a lot of gear and need to conserve weight.
These chemicals work by killing harmful bacteria and viruses. Most of the time, a simple wait of about 30 minutes is all it takes before you’re good to drink! They don’t need boiling water—another big plus when you’re on the go.
However, be aware that chemical purification does come with some flavor drawbacks. Some people find that the taste of iodine is pretty off-putting. I usually carry a little flavoring to help mask those strong tastes when necessary.
How to Use Chemical Purification
When using chemical tablets, start by following the manufacturer’s instructions closely. More tablets don’t mean faster purification, and that could lead you to a bad experience. I usually set a timer and take a moment to relax while I wait for it to do its magic.
Another tip is to mix the water beforehand if you can. Shaking it up ensures that the chemical distributes evenly. Just don’t get too carried away and splash it everywhere—you’ll only have that much water to work with!
Lastly, keep track of expiration dates on those tablets. Old chemicals can lose their effectiveness, and you definitely want your purification methods to be reliable, especially when you’re far from home.
Safety Concerns of Chemical Treatments
While chemical treatments can be effective, they also have their risks. Iodine is not recommended for pregnant women or those with thyroid issues. Plus, prolonged use isn’t advised either, so it’s best for short trips.
Another thing to remember is how chemicals can affect the taste and smell of water. You might tolerate it, but it could be a bit much for guests. This is when carrying some sugar or flavoring can come in handy to make things more pleasant!
Lastly, don’t forget that chemical purification doesn’t address physical contaminants or sediment. So if you’re dealing with muddy or foul-looking water, it’s best to filter or let sediment settle before you drop those tablets in.
Using UV Light Purifiers
The Magic of UV Light
Ultra-violet light purifiers are some truly cool gadgets. They’re compact and efficient, completely taking out bacteria and viruses with their light. No chemicals, no boiling—just light! I can’t tell you how awesome it feels to push a button and know the water is getting zapped.
However, you need to have batteries or a rechargeable source, which can sometimes be a pain to manage when you’re off the grid. I always try to plan ahead and bring extra batteries just in case!
Another thing to watch out for is water clarity. If your water has a lot of particulates, UV light won’t work as well. Turbid water can block the light, so always aim for clearer sources!
How to Utilize a UV Purifier
Using a UV purifier is typically straightforward. First, check to make sure your unit is functioning and the batteries are good to go. It’s also important to have a clear receptacle for the water—some purifiers require drinking bottles, while others can be used in any container.
Then, immerse the UV light in the water for the time specified in the instructions (usually around 30 seconds to several minutes). I love how simple it is—just watch the light and know that you’re treating your water effectively!
Once time’s up, your water is ready to drink. Just give it a quick shake if your purifier allows for that, and you’re set! Easy peasy.
The Limitations of UV Light Purification
Even though UV light is great, it’s not a complete replacement for other methods. Like I mentioned, it won’t deal with sediment and particulates. If your water is cloudy, you should probably filter it before zapping it with UV light.
Also, when using the UV light method, don’t forget that it requires a power source. If you’re camping for an extended time, keeping those batteries charged might become an issue! I usually scope out solar chargers if I think I’ll be relying on it a lot.
Lastly, make sure you’re aware of how long it takes to purify your water. This method can be quick, but if you don’t pay attention, it may hold you back from your plans. Timing is everything, especially when there’s adventure calling!
FAQ Section
1. Is it safe to drink water directly from rivers or lakes?
Not without purifying it first! Natural water sources can contain harmful bacteria and viruses that can make you sick, so always use a purification method before drinking.
2. How long does it take to boil water for purification?
You need to bring it to a rolling boil for at least one minute. If you’re at a higher altitude, run it for at least three minutes to ensure it’s safe.
3. Are chemical purification tablets effective?
Yes, they are effective for killing bacteria and viruses. Just make sure to follow the instructions and check for any health concerns with iodine if that’s what you’re using.
4. What water filter should I use for wilderness camping?
A good backpacking filter is essential. Look for one that’s lightweight and can handle pathogens and particulate matter. Do your research to find a product that’s reputable for wilderness conditions.
5. Can UV light purifiers handle cloudy water?
No, UV light won’t be effective on cloudy or turbid water as particulates can block the light from reaching pathogens. You should always filter the water first if it appears murky.
When I think about survival situations, one of the first things that pops into my mind is how to treat wounds. I’ve had my fair share of scrapes and cuts, and herbal compresses truly come to the rescue. Using fresh herbs like chamomile or calendula made into a compress can help reduce inflammation and promote healing.
You can make a compress by steeping the herbs in hot water and then soaking a clean cloth in this infusion. When you press it onto the wound, you’re not just applying moisture—you’re delivering those healing properties right where you need them. I’ve found this method incredibly soothing.
Just a heads-up though, always make sure the wound is clean before applying anything. It’s essential to avoid any kind of infection, which can really complicate healing. Trust me on this—I’ve learned the hard way!
Essential Oils for Disinfection
Essential oils like tea tree, lavender, and oregano come in really handy for disinfection. I always keep a small bottle of tea tree oil with me, as it’s known for its antibacterial and antifungal properties. When faced with a wound, diluting a few drops of the oil with a carrier oil can provide a natural disinfectant without the sting of conventional products.
Application is super easy; just dab it gently with a cotton ball on the affected area. I love the scent of lavender, plus it helps with relaxation—perfect when you’re stressed about being in a tough situation.
But remember, essential oils are potent! Always do a patch test to ensure you don’t have any allergic reactions. I can’t stress this enough; knowing your body’s reactions can make a world of difference.
Nutrients for Accelerated Recovery
Nutrition plays such a critical role in recovery that I can’t overlook it. I make it a point to consume plenty of vitamin C-rich foods like berries and citrus whenever I’m dealing with a wound. They help with collagen production and healing processes. If you can forage or have access to these foods in the wild, don’t skip them!
Additionally, incorporating protein sources like beans or nuts is vital in building new tissues. I’ve relied on nuts for energy and protein on numerous outdoor trips, and they’ve never let me down.
Remember, every little nutrient counts! Your body needs all the help it can get when bouncing back from injuries, so keep that diet packed with natural goodness.
Digestive Aids
Herbal Teas for Upset Stomachs
Upset stomach? Yikes! I’ve been there, especially after being out in nature for a few days with questionable cuisine. That’s when herbal teas come to the rescue. Peppermint or ginger tea can work wonders for soothing digestive issues. Just a few sips can help ease nausea and discomfort.
In the wild, I’ve managed to make ginger tea with wild ginger roots. It’s refreshing and works incredible magic on a troubled tummy. Make sure to steep the ginger properly, and you’ll feel that warm embrace soothing your insides.
And don’t forget about chamomile! That little flower has a calming effect on both your stomach and mind. Perfect combo in a tense situation, right?
Probiotics from Natural Sources
Keeping gut health in check is a survival priority, and fermented foods are packed with probiotics that can really help. Though in a tough situation, options might be limited, look for wild edibles that could have some fermentation properties.
I’ve often found wild dandelion greens—great for promoting digestion. They’re super nutritious, and I like munching on them when I feel off. Plus, they can help with nutrient absorption—so again, totally worth it!
If you have access to yogurt, that’s also a fantastic source of probiotics. Just one serving can boost your gut health immensely. I treat it like liquid gold during my adventures.
Natural Laxatives
In the world of survival, constipation isn’t just uncomfortable; it can actually become a serious issue. That’s why I always keep my eye out for natural laxatives like senna leaves or prunes, which help keep everything moving along.
Senna is a powerful herb that’s been traditionally used for its laxative properties. Just be cautious on dosages; I’ve learned the hard way that a little goes a long way! Steeping senna in hot water is the way to go for a relaxing drink.
And if you can find some wild berries or apples, they’re not only delicious—especially after a rough day—but they’ll also keep your digestive system functioning like clockwork. Easy, natural remedies right from nature!
Respiratory Relief
Steam Inhalation Techniques
Breathing issues? They can really put a damper on your survival situation. I’ve found that steam inhalation can work wonders. Whenever I have a cold or am dealing with congestion, simply boiling water and inhaling the steam can provide immediate relief. Adding a few drops of eucalyptus oil elevates the benefits even more.
To do this safely, I always keep a safe distance from the boiling pot—no one wants a face full of steam burns! Covering my head with a towel creates a mini steam tent that traps all that therapeutic goodness. It’s like a spa treatment wherever you are!
The warmth and moisture also help with throat irritations, which let’s be real, can happen way too easily when you’re out and about. Just give it a try next time you feel stuffy.
Natural Expectorants
If you’ve got a phlegmy cough, nature’s got your back! Some herbs like thyme and peppermint work as natural expectorants. I usually brew a strong herbal tea from these plants when I feel my throat getting scratchy. They’re not just soothing; they help loosen mucus too!
Making a simple syrup from honey and thyme is another trick I keep in my toolkit. If you’ve never tasted it, you are missing out! Not only is it sweet and enjoyable, but it works brilliantly to ease throat discomfort.
So next time you’re feeling under the weather, turn to your local herbs and see what they can do to help you breathe easier!
Herbal Cough Syrups
When I’m dealing with a nagging cough, I’ve found that homemade herbal cough syrups work wonders. Combining honey with herbs like marshmallow root or slippery elm creates a soothing mixture that coats the throat. It’s a game-changer for those stubborn coughs!
This is super easy to make—just mix the herbs with honey and let it infuse over a couple of days. I’ve even improvised with other sweeteners when honey wasn’t around, and it still did the trick. The key here is to keep it natural and gentle while soothing your throat.
It’s pretty cool knowing that I can whip up something effective from my surroundings or pantry, rather than relying on store-bought options that might not even be handy in a pinch!
Skin Care for Harsh Conditions
Natural Sunscreens
When you’re out in nature, protecting your skin from harsh sun rays is non-negotiable. I’ve experimented with various natural sunscreens using ingredients like coconut oil infused with shea butter and zinc oxide. It’s not only effective but also moisturizing, which is a bonus!
Mixing a little bit of carrot seed oil into the blend gives it added sun protection benefits. You can easily create a homemade sunscreen in a jar and warm it up before applying it as needed. I swear by applying this every few hours, especially during long hikes or outdoor activities.
But always remember to patch test any new concoctions on your skin before slathering it on. The last thing you want is a reaction that could ruin your adventure!
Moisturizers from Nature
Harsh environments can lead to dry, cracked skin, which is where natural moisturizers come into play. I’ve often used shea butter or even plain coconut oil to keep my skin hydrated. They’re simple yet incredibly effective and totally safe for sensitive skin too.
In addition, if you find aloe vera while out there, grab it! The gel is fantastic for soothing sunburns or dry patches. Trust me; I’ve turned to the aloe plant more times than I can count, and it never lets me down.
Making sure your skin stays soft can help avoid further complications or infections, so make this a priority when you’re in survival mode.
Natural Insect Repellents
Insects can really make survival situations harder, especially mosquitoes. I learned how to whip up natural repellents using essential oils like citronella and lemongrass mixed in carrier oils. Applying this blend, not only keeps the bugs away, but it smells good too!
I’ve also used witch hazel mixed with essential oils as a spray. It’s light, refreshing, and really practical. If I can’t find any ready-made version, this DIY spray comes in handy to keep those pesky insects at bay.
Remember, reapplication is key! These natural options might not last as long as chemical ones, but it’s still worth it to avoid those nasty bites.
FAQs
1. What are the best natural remedies for treating wounds?
Using herbal compresses, essential oils for disinfection, and ensuring good nutrition can greatly aid in wound healing.
2. How can I soothe an upset stomach naturally?
Herbal teas like peppermint or ginger are fantastic for settling stomach issues. Also, looking for wild edibles that can aid digestion is beneficial.
3. What should I do about respiratory issues while in the wild?
Steam inhalation and herbal expectorants, as well as making your own cough syrup with honey and herbs can help ease respiratory discomfort.
4. How can I protect my skin from the sun naturally?
Natural sunscreens made from coconut oil, shea butter and other ingredients provide a great barrier against sun damage while moisturizing your skin too.
5. What are some effective natural insect repellents?
Essential oils like citronella and lemongrass, mixed in a carrier oil or witch hazel, work effectively to keep insects at bay.