
by Preparation | Aug 3, 2025 | Preparation Call
In a world where natural calamities and unforeseen events loom large, taking proactive measures is essential. The truth is, disasters can strike without warning. From hurricanes to wildfires, earthquakes to pandemics, understanding the risks associated with your specific location is the first step toward safeguarding your family and property.
## Understanding the Risks: Identifying Potential Disasters
Start by assessing the types of disasters that are most likely to affect your area. Is it prone to flooding or tornadoes? Are earthquakes a frequent concern? Conduct thorough research through local government websites or community bulletins to identify prevalent hazards. By knowing what you may face, you can tailor your preparedness approach more effectively.
## Building Your Disaster Plan: Essential Steps for Every Household
Once you’ve identified potential risks, it’s time to create a disaster plan tailored specifically to your household’s needs. Discuss it with all family members—everyone should know how to respond in an emergency. Designate meeting points both inside and outside your home where everyone can gather if separated during an evacuation. Additionally, establish communication methods; consider how you’ll connect if cell service is disrupted.
## Stocking Up: Creating Your Emergency Supply Kit
A well-stocked emergency supply kit can be a lifesaver when disaster strikes. Start with the basics: water (one gallon per person per day), non-perishable food items, first aid supplies, flashlights, batteries, and personal hygiene products. Don’t forget about unique requirements like medications or pet supplies! Tailor kits for each family member’s needs and keep them in easily accessible locations. Regularly update these kits every six months—check expiration dates on food and replace any used items.
## Staying Informed: Utilizing Technology and Community Resources
In today’s digital age, staying informed has never been easier—or more critical. Leverage technology such as weather apps that send real-time alerts about impending threats. Social media platforms also provide vital updates from local authorities during emergencies. Beyond personal resources, engage with community organizations focused on disaster preparedness; they often offer workshops or training sessions that empower citizens with knowledge and skills.
## Training and Drills: Preparing Your Family and Community
Preparation doesn’t stop at creating plans—it involves practice too! Conduct regular drills within your household so everyone knows what to do when a crisis occurs. This not only instills confidence but also helps identify areas needing improvement in your plan. Consider organizing neighborhood gatherings or workshops aimed at community readiness; fostering connections among residents enhances collective resilience.
## Recovery and Resilience: Post-Disaster Action Steps
Even after a disaster has passed, recovery remains crucial for long-term resilience. Assess damage immediately while ensuring safety comes first—never enter unstable structures without professional guidance! Document everything for insurance purposes; photographs prove invaluable in claims processes. Stay connected with local resources offering assistance like temporary shelters or financial aid programs designed for recovery efforts.
Ultimately, being prepared means living with a sense of purpose rather than fear—embracing proactivity leads us down the path of resilience against life’s uncertainties. By understanding risks, building solid plans, stocking essentials wisely, leveraging technology effectively, practicing regularly—and preparing for recovery—we not only protect ourselves but empower our communities as well. Don’t wait until it’s too late; take these steps now!
by Preparation | Aug 3, 2025 | Preparedness
Understanding Your Emotions
Recognize the Signs of Stress
When I’m in a survival situation, stress can manifest in so many ways. It’s easy to become overwhelmed, but the first step is recognizing when stress kicks in. I often pay attention to my body – whether my heart starts racing or if I feel more irritable. Paying attention to these cues helps me to acknowledge that I need to take a step back and breathe.
Next, it’s essential to understand that stress is a natural response. Sometimes I try reminding myself that it’s okay to feel anxious, especially in unfamiliar or dangerous environments. This realization allows me to approach the situation with a clearer head, rather than feeling ashamed or frustrated about my emotions.
Finally, I find it helpful to talk about my feelings, even if it’s just to myself. Verbalizing what I’m experiencing can help me process my emotions better and diffuses a lot of the pressure that builds up inside. It’s also a great way to identify what I can do next to manage the situation at hand.
Establishing a Routine
Creating a Daily Schedule
When the world feels chaotic, I always find comfort in routine. No matter how minimal the circumstances, a routine gives me something to focus on. For instance, when I’m navigating a tough survival scenario, I schedule my day into segments – searching for resources in the morning, building shelter in the afternoon, and gathering around a fire at night.
Sticking to a routine keeps my mind engaged and provides a sense of normalcy. I often zone in on small, achievable goals rather than thinking about the bigger picture. This approach keeps stress at bay and gives me little victories to celebrate throughout the day.
Plus, routines help me maintain physical health, which is crucial in survival situations. I make sure I’m eating regularly, hydrating, and setting aside time for rest. Just like any structure in life, having a good routine can be your best friend when you’re out in the wild.
Mindfulness Techniques
Breathing Exercises
I swear by breathing exercises when the stress starts building up. Simple techniques like the 4-7-8 breathing method have helped me immensely. I inhale for a count of four, hold for seven, and exhale for eight. This method not only calms my mind but also can lower my heart rate, which is priceless in high-pressure scenarios.
Another technique I love is box breathing. I visualize a box while I breathe: inhaling as I count to four, holding at the top for four, exhaling for four, and holding again for another four. It really helps to ground me and pull my focus back into the present moment.
When I found myself stuck in a particularly gnarly situation, I took a moment to just breathe and focus on the sensations around me – the fresh air, the rustling leaves. This grounding practice shifted my mindset from panic to one of gratitude and awareness. Seriously, connect those breaths!
Physical Activity
Incorporating Movement into Your Day
You might not think of exercise as a stress reliever, but let me tell you, it’s huge! Whenever possible, I find ways to move my body. Whether it’s a brisk walk, doing some squats, or even just stretching, physical activity releases endorphins that boost my mood. Plus, when I’m focused on movement, I can’t help but forget my worries for a little while.

I’ve even created mini-challenges for myself, like seeing how many steps I can accumulate in a day or practicing my skills, like climbing trees or building structures. Engaging my body not only helps relieve stress but also sharpens my survival skills.
By incorporating movement into my survival routine, I find that I can tackle challenges more effectively. The mind and body are intertwined, and when I take care of my physical wellness, it truly reflects in my mental state.
Connecting with Nature
The Benefits of Nature
There’s just something about nature that calms my spirit. When I’m out in the wild, I take every chance I can to connect with the surroundings. I take moments to identify the local flora and fauna, or even just listen to the sounds of the environment. Nature has a unique ability to remind us of something bigger than ourselves, which can put our stress in perspective.
I often sit quietly by a stream or under a tree and soak in my surroundings. This practice not only calms my nerves but also reminds me of the beauty and resilience of life. When I immerse myself in nature, it injects a sense of peace that surpasses any survival anxiety.
Additionally, I’ve found that practicing gratitude while in nature can alleviate my stress. I take a moment to appreciate what’s around me – the sun filtering through leaves or the sound of birds chirping – and I can feel a weight lift off my shoulders. It’s a great way to shift into a positive mindset and appreciate what we have, even in tough situations.
Frequently Asked Questions
1. What is the first step I should take in a survival scenario?
The first step I recommend is to pause and assess the situation. This includes recognizing your emotional state and the immediate environment. Take a deep breath and focus on what resources are available to you.
2. Can routines really help in a survival situation?
Absolutely! Having a routine helps provide structure and normalcy. It allows you to focus on tasks that will aid your survival while keeping stress at bay.
3. How can I practice mindfulness without much prior experience?
Start simple with breathing exercises. Start with your breath and practice focusing your mind on the present moment. With practice, you’ll find it becomes easier and more effective.
4. Is physical activity essential in survival?
Yes, physical activity not only maintains your physical fitness but also releases endorphins that can help manage stress. Movement can be as simple as stretching or going for a walk.
5. How does connecting with nature help alleviate stress?
Nature has a calming effect that can ground you and put things into perspective. Taking time to appreciate the environment can shift your mindset positively and reduce anxiety.
by Preparation | Aug 3, 2025 | Preparedness
Choosing the Right Materials
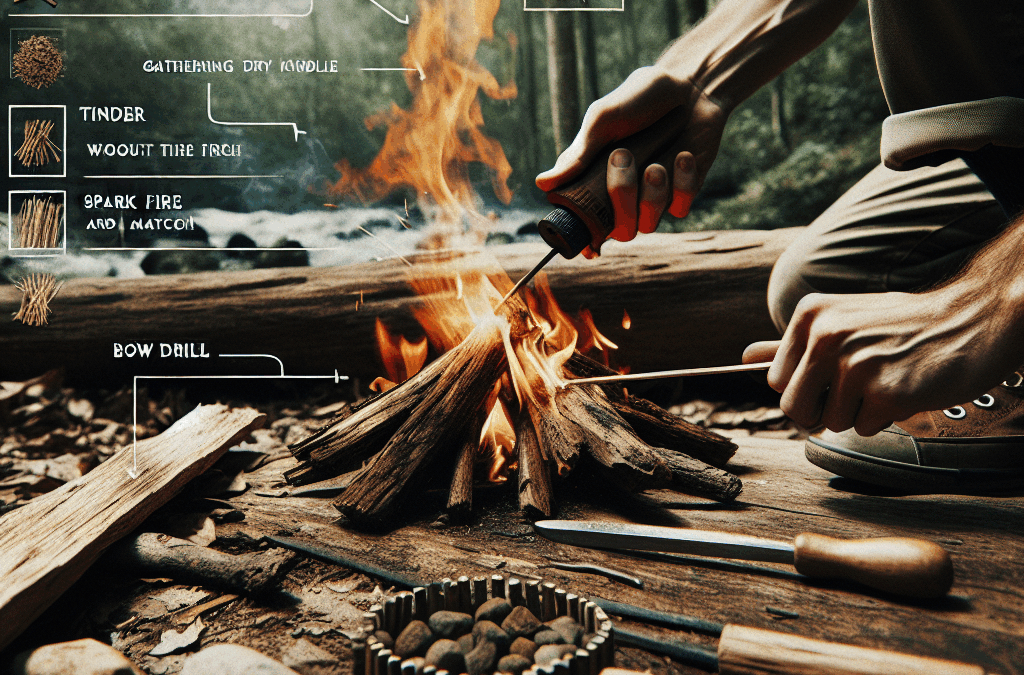
Gathering the Essentials
When it comes to starting a fire without matches, the first step is choosing the right materials. You need to gather dry tinder, kindling, and fuel wood. Tinder can be anything from dry leaves to the fluffy fibers found on certain trees. I’ve even used shredded paper when I was desperate out in the woods!
For kindling, look for small sticks and twigs that can easily catch fire. These should be about the thickness of a pencil at most. And for the large fuel wood, you want logs that will sustain a longer burn. Trust me, you’ll thank yourself later when you don’t have to keep re-stocking the fire.
The key here is to make sure everything is dry. Wet materials will only lead to frustration and a lot of smoke without any flame. So, scout around, and don’t rush this part!
Using Friction Techniques
The Bow Drill Method
One of the classic techniques for starting a fire without matches is the bow drill. This method takes a little practice, but once you get it down, it’s incredibly effective. You’ll need a bow, a drill (which is basically a stick), a fireboard (a flat piece of wood), and a hearth board for catching the ashes.
The idea is that the bow, which is a curved stick with a string attached, helps spin the drill quickly against the fireboard, creating friction and ultimately ash. You’ll want to create a small notch in your fireboard for the ash to fall into. After a bit of grinding, you should see some smoke and maybe even some glowing embers!
This technique takes a bit of strength and stamina, so be patient with yourself. It can be a workout, and the first few tries might not yield results. I remember my first time—it was a bit embarrassing, but oh, when I finally got that flame, it was worth every drop of sweat!
Creating Sparks with Flint and Steel
Assembling Your Tools
If you’re not into the whole friction thing, let’s talk about flint and steel. It’s an age-old method and super reliable once you learn how to wield it. You’ll need a piece of flint (or quartz) and some steel—often a back of a lighter works well in a pinch.
To use this method, you strike the flint against the steel in such a way that it creates a spark. This spark needs to land on your prepared tinder. I like to keep my tinder bundle loose so that all those fibers catch the spark quickly!
It’s pretty awesome to see that tiny spark turn into a fire. Just make sure to have your tinder nice and prepared. And hey, practice makes perfect, right? You might want to try this technique in your backyard before taking it into the wild!
Fire Plough Technique
Setting Up for Success
Another fascinating method is the fire plough. This is where you carve a groove into a piece of wood and then rub another stick against it. It’s all about the friction, just like the bow drill, but this time you’re going to be ploughing instead of drilling!
First, you need a sturdy base for your fire plough, which can be a thick piece of soft wood. Then, find a stick that fits snugly in your hand for the plough action. As you push the stick back and forth in the groove, tiny splinters of wood will start to form. With a bit of persistence, you’ll create some heat and hopefully catch some ember.
This technique might not be as popular or well-known, but it’s truly a nifty trick to have under your belt! I still remember the first time I successfully ploughed my way to a fire—there’s nothing quite like that satisfying glow of flames after some hard work!
The Importance of Fire Safety
Staying Safe and Responsible
Okay, so once you’ve got that fire going, let’s talk about fire safety. I can’t stress enough how crucial it is to respect fire and its power. Always make sure you’re in a clear area away from flammable materials.
Have a bucket of water or dirt handy to extinguish the fire when you’re done. It’s a good practice to create a small fire ring or put your fire in a fire pit to contain it better. Trust me, nobody wants their camping trip to be remembered for an out-of-control blaze!
Lastly, always check for fire restrictions in the area you’re at. Some places prohibit open fires to protect the wildlife or during dry seasons. It’s always better to be safe than sorry. Be a responsible adventurer!
Frequently Asked Questions
1. Can I use any type of wood for fire making?
Not all wood is created equal! You want dry, seasoned wood for the best results. Softwoods like pine or cedar work great. Just steer clear of damp or green wood, as it won’t ignite easily.
2. How long does it take to get a fire started without matches?
This really depends on the method you’re using and your skill level. Some might get it going in just a few minutes, while others could take longer if they are just starting out.
3. What if I can’t find flint or steel?
If you can’t find flint or steel, don’t worry! You can always resort to friction methods like the bow drill or fire plough. Nature offers plenty of alternatives; you just have to get a little creative!
4. Can I really start a fire with just my hands?
Well, sort of! Using your hands in the friction methods (like the bow drill) is common. However, you won’t start a fire simply by rubbing your hands together—sorry!
5. Is it okay to make a fire anywhere?
Nope! Always check for local regulations regarding fire making. Many places have specific areas for campfires to minimize risks to the environment, especially in dry seasons.
And there you have it, folks! A complete guide on how to start a fire without matches. Remember, it’s all about patience, practice, and safety. Go out there and impress your friends with your newfound skills!


