
by Preparation | Aug 2, 2025 | Preparedness
Nature Retreats
Exploring Local Parks
One of my absolute favorite escapes from the hustle and bustle of city life is hitting the local parks. Imagine this: it’s a Saturday afternoon, and instead of being cooped up in your small apartment, you’re surrounded by the lush greens and sounds of birds chirping. Parks often have hidden trails that let you immerse yourself in nature without needing to drive too far. They can be a breath of fresh air—literally!
Here’s a tip: I like to pack a little picnic, grab a book, or even my favorite podcast, and just chill for a bit. The best parks have spots where you can really unwind, often with picnic tables or benches just waiting for you to plop down and enjoy a sunny day.
If you’re lucky enough to live near a botanical garden, make sure to check it out. They usually have themed garden sections—think tropical, desert, or butterfly gardens! They provide a mini-vacation right where you live.
Day Trips to Nearby Trails
If you’re itching for some adventure, why not take a day trip to nearby hiking trails? I’ve discovered that sometimes you can find a trail just a short drive away from urban chaos. It’s amazing how quickly you can escape the noise and find yourself in a completely different world, one filled with stunning vistas and fresh air.
A friend of mine always says that the best views come after the hardest climbs. And while that sounds cliché, she’s absolutely right! Once you get to the top of a trail, the satisfaction of taking in those breathtaking views makes all the effort worthwhile.
Plus, hitting the trails is a great way to work out while having fun. Whether you’re solo or in a group, there’s something rejuvenating about being out in nature. Just don’t forget to pack plenty of water and snacks!
Beach Escapes
No city escape plan is complete without a trip to the beach, am I right? The sound of waves crashing and the warmth of the sun are the best kind of refreshment. I love the feeling of sand between my toes while soaking in those rays. Whether it’s a quick drive to a nearby coastline or a longer adventure, there’s just something so freeing about the beach.
What’s great about the beach is that it caters to everyone. Are you a sunbather? Grab a towel and soak up the vibes. Prefer something more active? Try beach volleyball or surfing if you’re feeling adventurous!
For me, sunset on the beach is magical. The horizon filled with colors is the perfect way to end a day. Plus, you can bring your friends and make a bonfire to complete the experience. It’s the perfect way to recharge!
Cultural Experiences
Art Galleries and Museums
Sometimes, I need to escape the city’s chaos by diving into art and culture. Art galleries and museums often host exhibitions that can transport you into different worlds. They are great places to contemplate and reflect, away from the daily grind. Plus, a lot of museums offer free entry on certain days, making it easier to enjoy some culture without breaking the bank!
I’d recommend checking out lesser-known galleries too—sometimes they have the most intriguing work. You might just stumble upon an up-and-coming artist whose work resonates with you! Every visit sparks a little light of inspiration.
Pro tip: many museums have cool events like lecture series, workshops, or even social nights. It’s a fab way to meet people who share similar interests!
Local Festivals and Markets
City dwellers often overlook local festivals and markets, but they can be a great escape. I’m talking about community events where you can taste amazing food, listen to live music, and just hang out with folks. It feels like getting a slice of your city’s culture outside your regular four walls.
I’ve had a blast at street fairs—there are always unique crafts, food from different cultures, and live performances. It’s a vibrant experience that brings the community together, which is fulfilling in indescribable ways.
Keep an eye on local announcements and don’t shy away from trying things you wouldn’t normally experience. They often hold workshops in art or cooking, and you could learn something new while mingling with locals.
Historical Walking Tours
Exploring your own city through a historical walking tour can be a surprisingly refreshing escape. I stumbled upon this when a friend suggested it, and boy, was I grateful! Learning about the city’s history and architecture makes you appreciate where you live even more, bringing a whole new perspective to your everyday scenery.
Many cities have guided tours, but a self-guided version can be just as fun, especially when you have an audio guide. There’s something about strolling through iconic sites that helps you disconnect from your daily stresses.
Plus, walking is great exercise. I tend to make a day of it—explore a neighborhood’s history and grab lunch afterward at a local eatery. Combine exploration with a delicious meal, and you’ve got a day well spent!
Outdoor Activities
City Biking
Biking around the city is one of my all-time favorite escapes. There’s a wind-in-your-hair feeling that takes you away from stress. Many cities offer bike-sharing programs, making it easy to rent and ride without the commitment of owning one.
Riding allows me to explore hidden gems in my city, from quaint coffee shops to vibrant murals. It’s also a blast to meet up with friends for a biking adventure. We often plan routes that lead to local parks or popular food spots!
Be sure to pick a bike-friendly city. Some places have bike lanes that make your ride safe and enjoyable, while others may seem daunting. When I’m on my bike, it feels like I’ve found a secret passage that leads me on mini-adventures.

Sports Activities
If biking isn’t your jam, consider joining a local sports league. There’s something about team sports that brings the community together. I’ve played in a few leagues—soccer, softball, and even ultimate frisbee. The camaraderie is fantastic!
Not only do you get exercise, but you also get to meet new people and shake off the day’s stresses on the field. Honestly, it feels less like exercise and more like fun, especially at the post-game hangout where everyone cheers for each other.
And if you’re not keen on competitive sports, many cities have outdoor yoga or fitness classes in community parks—you can stretch it out while soaking in some sunshine.
Camping Expeditions
I know camping can sound daunting for some city dwellers, but it’s one of the ultimate ways to escape! There’s something about a cozy tent under the stars that makes all your worries melt away. I usually grab my essentials and hit up a campsite for the weekend.
When I’m out camping, I love spending time hiking, fishing, or simply enjoying nature. And there’s nothing quite like sitting around a campfire on a cool night. It’s a magical experience to share stories and roast marshmallows with friends.
Even if you’re a newbie to camping, many parks offer cabins or yurts for a comfy night’s sleep. It’s an excellent introduction to the outdoors without sacrificing all your comforts.
Urban Escapes
Coffee Shops and Co-Working Spaces
Sometimes I just need to escape to a cozy coffee shop to recharge. There’s something magical about sipping a latte while typing away or just people-watching. Urban coffee shops often have unique vibes and can be a great spot to enjoy some solitude or catch up with friends.
If you’re working from home, changing your scenery can be a game-changer. Co-working spaces provide a productive vibe without the chaos of your usual surroundings. It can help you boost your creativity and keep you motivated!
Don’t forget that many coffee shops host local events or art showcases in the evenings. It’s a lovely way to spot new artists and connect with your community while enjoying your favorite brew.
Local Bookstores
I love wandering through my local bookstores. There’s something soothing about the smell of books and the hushed atmosphere. While hanging out, you might discover a hidden gem of a read or learn about upcoming local author events!
Many bookstores have cozy seating areas where I can curl up with a good book. It’s a great way to unwind while getting that sensation of being somewhere other than your usual haunts.
Plus, independent bookstores often cultivate a community spirit with book clubs and signings, which allow you to meet people who share your interests. These events can lead you to new friendships and adventures!
Spa Days
If you really want to escape the hustle and bustle, why not treat yourself to a spa day? I’m all about a little pampering now and then, whether that’s a massage, a skincare treatment, or simply relaxing in their saunas.
Spas often offer packages that allow you to spend a whole day indulging in treatments that can help relieve stress. It’s a fabulous way to hit the reset button on life! I guarantee you’ll leave feeling like a whole new person.
And let’s be real, a day dedicated to self-care is a much-needed escape and can recharge your batteries better than anything else. So go ahead and treat yourself—you deserve it!
FAQ
1. What are some quick escape options for city dwellers?
Some great quick escape options include visiting local parks, exploring nearby hiking trails, enjoying beach days, or diving into cultural experiences like galleries and festivals.
2. How can I find hidden gems in my city?
Take the time to explore neighborhoods you don’t usually visit. Check local event boards or social media for community events, as they often showcase local art and culture.
3. Do I need a lot of time to enjoy these escapes?
Nope! Many of these ideas can be enjoyed in just a few hours. Weekend mornings or late afternoons can provide the perfect window for a fresh escape.
4. What should I bring for a day out in nature?
Packing light but efficiently is key! Bring plenty of water, snacks, sunscreen, and if you enjoy reading or podcasts, take your favorite book or headphones along.
5. Can I enjoy these escapes alone?
Absolutely! Many of these activities are perfect solo adventures. Whether it’s a relaxing day at the beach or a quiet morning at a coffee shop, you can unwind your own way.
by Preparation | Aug 2, 2025 | Preparedness
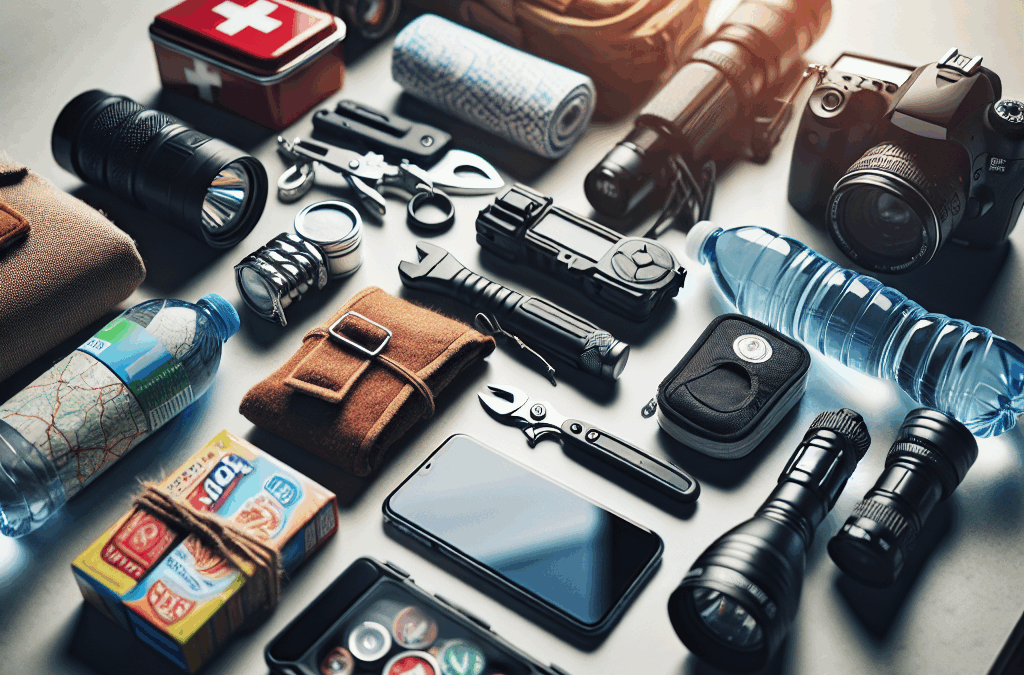
Emergency Supplies
First Aid Kit
Let’s face it: nobody plans to get injured, but accidents happen. That’s why having a well-stocked first aid kit in your car is a must. When packing your kit, think about including items like band-aids, antiseptic wipes, gauze, and adhesive tape. It’s like having a mini emergency room at your fingertips!
Also, don’t forget to include over-the-counter meds. Things like pain relievers and allergy medications can save the day if you’re in a pinch. Sometimes, distracted drivers or sudden allergies can turn a day into a nightmare, so being prepared can make all the difference.
Lastly, check your kit regularly. I can’t tell you how many times I’ve found outdated items in my own! Make sure everything is in good condition and replace expired products so you’ll be ready for anything when it counts.
Flashlight and Extra Batteries
Picture this: it’s dark out, you’re on the side of the road, and you can’t see a thing. That’s when a trusty flashlight comes into play. A bright, reliable flashlight can be the knight in shining armor you didn’t know you needed. When choosing one, opt for an LED model; they’re super bright and last forever.
While you’re at it, toss in some extra batteries. The last thing you want is your flashlight dying during a critical moment. A pack of good quality batteries doesn’t take up much space and can save you a whole lot of trouble.
And hey, keep your flashlight easily accessible! There’s no use in having one tucked away in a hidden compartment. I learned the hard way to keep mine right in the glove box for quick access. Trust me, you don’t wanna be fumbling around in the dark.
Roadside Flares
Roadside flares are an old school but gold school kind of tool to have in your kit. They’re perfect for alerting oncoming drivers that you’re stuck. It’s all about safety, right? You don’t want someone to unintentionally zoom by and make a tough situation even worse.
Setting them up is easy. Just light one and place it a safe distance away from your vehicle, and voila, instant signal! This little precaution can give you peace of mind when you’re waiting for help to arrive.
Plus, they can also serve multiple functions—not just alerting others. Feel free to get creative; you can use them to light a small campfire in a pinch! I’ve had a couple of unexpected overnight waits during road trips, and it definitely came in handy.
Basic Tools
Multi-Tool
Let’s talk about the ultimate multi-tool. This handy gadget can really save your bacon. Picture it: you have a wrench, a screwdriver, and even scissors all in one tool. It’s like having a Swiss army knife that you can count on when things go haywire.
Whether you need to tighten a loose battery cable or cut a rope, a multi-tool is versatile enough to handle most little emergencies that arise on the road. I can’t tell you how many times it’s helped me out in sticky situations—it’s definitely one of those “better safe than sorry” items.
Don’t forget to practice using your multi-tool before you need it! Familiarize yourself with all its functions. Trust me, it’s worth it to know how to operate it when you’re in a jam.
Jumper Cables
We’ve all been there—your battery decides to take a nap just when you need it most. Jumper cables are an absolute lifesaver in those situations. When choosing a set, opt for heavy-duty cables that are long enough to reach another car’s battery. You want to be prepared!
Learning how to use them isn’t too hard either. Just respect the color coding; red to red, black to ground. I’ve had my fair share of “oh no” moments, and believe me, knowing how to get my car up and running can save a whole day’s plans.
And hey, it’s even better if you learn how to help others! Jump-starting someone else’s car not only gets them back on the road but can turn into a fantastic conversation starter. You might just make a new friend!
Spare Tire and Jack
A flat tire can be an absolute bummer, but having a spare tire and jack can make all the difference. I always keep my spare in good condition, ensuring it’s properly inflated. You’ll thank yourself later when you can easily swap out that flat!
When it comes to the jack, practicing the process ahead of time can save you a lot of frustration. Knowing the steps and how to operate the jack is just as essential as having one on hand. I remember the first time I had to change a tire—it felt like an obstacle course!
Oh, and don’t forget to check your lug wrench! It won’t do you any good if it’s rusted and won’t budge when you need it. Preventive maintenance goes a long way, and it’s important to ensure that all your tools are in working order.
First Aid and Comfort Supplies
Water and Snacks
Staying hydrated is key when you’re on the road. I always stash a couple of bottles of water in my car. If you’re ever stuck, having water can help keep things calm and collected while you wait for help. Keeping a few snacks in your glove compartment is also a smart move; granola bars or trail mix can provide energy when you need it most.
It’s also a good idea to rotate out snacks and water periodically. Nobody wants to find a half-eaten protein bar from last summer! Keeping everything fresh is crucial to make sure you’re ready for any roadside adventure.
And if you share your vehicle with others, consider their preferences too. Making a small supply stash that everyone enjoys can go a long way; it’s not just about comfort but unity during a journey!
Blanket or Sleeping Bag
You never really think of how chilly it can get while you’re waiting for help, whether it’s summer night or in the middle of winter. Bringing a blanket or sleeping bag is a smart move; it’ll keep you warm and comfortable while you figure out your next move.
Choosing one that’s compact and easy to store is best—they shouldn’t take up too much room. When I step out for a road trip, I always throw a lightweight emergency blanket in the back. It’s amazing how much comfort a little warmth can provide when you’re feeling worried.
Plus, a blanket can double as a picnic blanket or even a makeshift cover if the sun is too hot. Versatility is key with any items in your survival kit, and the blanket comes in clutch for lots of unexpected situations.
Phone Charger
Let’s not underestimate how vital staying connected is. A car phone charger is a game changer, especially if you’re using your phone for navigation or just need to stay in touch with someone. It’s a small investment for a huge sense of safety.
Having a charged phone means you can call for roadside assistance or let someone know where you are if trouble hits. My favorite trick is to get a charger that plugs into both the car and the wall. It’s versatile and keeps my devices ready for action.
Also, think about downloading essential apps for roadside emergencies or even just keeping a list of towing services in your contacts. It’s those little steps that can put your mind at ease when things go south.
Safety Gear
Reflective Vest
A reflective vest is a small piece of gear that can make a big difference when you’re pulled over on the side of the road. Being visible to other drivers is crucial, especially in emergency situations. I keep mine close at hand so that I can easily slip it on if I need to work on my car.
Additionally, it adds a layer of protection. If you’ve ever had to change a tire or look under the hood, you know the last thing you want is to be clipped by passing cars. Staying bright and visible helps you stay safe!
When I wear my reflective vest, I feel a little more empowered, knowing that I’m taking steps to ensure my safety while I’m working. Plus, it’s an easy item to pack and doesn’t take up much space in my kit.
Fire Extinguisher
It might sound a little extreme, but a fire extinguisher is a smart thing to have in your car. In case things heat up under the hood or you witness a small fire, it’s a tool that can make all the difference. Choose a compact, car-rated extinguisher that you can easily access. Keeping safety first, right?
Knowing how to use it is just as important as having one. Familiarize yourself with the acronym PASS: Pull, Aim, Squeeze, and Sweep. This simple guideline can help you remember the steps in an emergency.
Also, keep an eye on the expiration dates. A fire extinguisher will only work if it’s within the recommend usage period, so a quick check every few months is a good idea!
Emergency Whistle
Believe it or not, a simple whistle can be a powerful tool in an emergency. If you were to find yourself in a sticky situation or needing to alert others, it’s louder than your voice and uses far less energy. It’s a must-have as part of your safety gear.
I like to keep mine attached to my glove box, so it’s always within reach. It’s a small item that you can easily forget about, but when the time comes to use it, you’ll be glad you have it at hand. Counting on technology might let you down, but a whistle is reliable and never needs charging!
Plus, it can also be fun for signaling at a picnic or just playing around! You can’t go wrong with adding a little playful aspect into your car survival kit.
FAQ
What items are essential for my car survival kit?
Essential items include a first aid kit, flashlight, jumper cables, snacks, and a reflective vest. It’s all about covering the bases for emergencies!
How often should I check my car survival kit?
I recommend checking your kit every few months to ensure everything is in good condition and up to date, especially food and medical supplies.
Are there any items you think are often overlooked?
Absolutely! People often forget about simple items like a phone charger and a whistle. They’re compact and can really help in emergencies.
Do I really need a fire extinguisher in my kit?
Yes! A fire extinguisher can be crucial if something goes wrong with your engine. It’s a small investment for the peace of mind it provides.
Can I customize my survival kit based on my needs?
Definitely! Personalizing your survival kit to fit your unique needs and travel habits is vital. Add items that make sense for you and your typical journeys.
by Preparation | Aug 2, 2025 | Preparedness
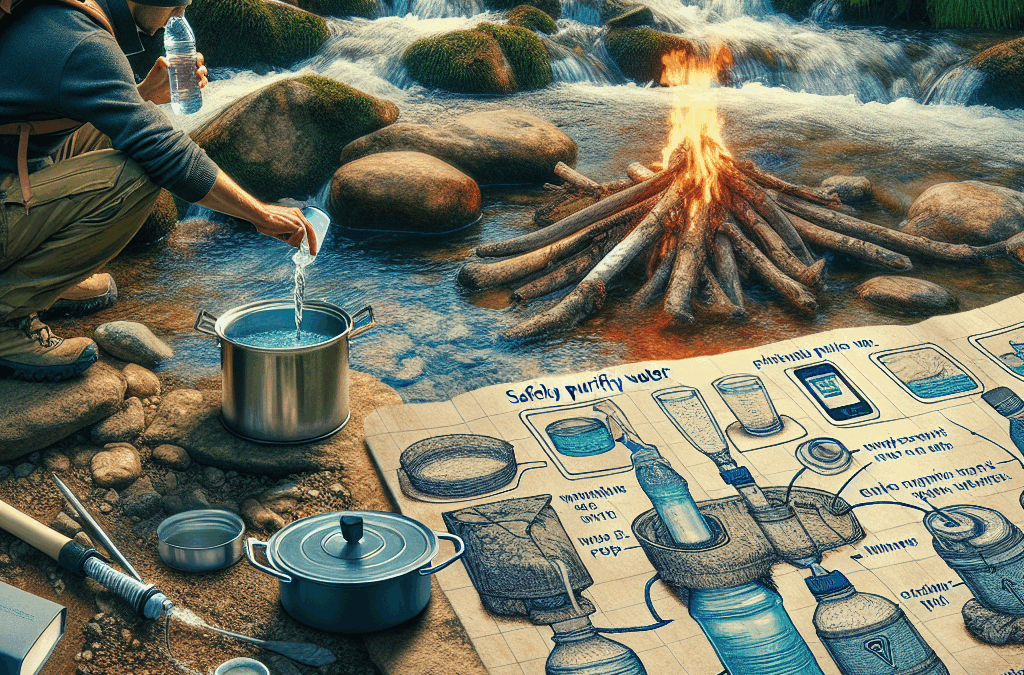
Hey there! So, you’re out in the wild, maybe hiking or camping, and you realize you need water. The good news is that nature provides, but you gotta be smart about it. Let me share what I’ve learned about purifying water in the great outdoors, covering five major methods that can keep you hydrated without getting sick!
Boiling Water
Why Boiling is Effective
Boiling water is one of the oldest and simplest methods, and it always amazes me how straightforward it is. The high temperatures kill off bacteria, viruses, and parasites. Basically, if you bring water to a rolling boil for at least one minute, you’re in the clear. If you’re at higher altitudes, you might wanna crank it up to three minutes just to be safe!
In my experience, I usually look for clear water—it’s a good sign that it’s probably cleaner than murky options, even though it’s not a guaranteed sign. Once I’ve got my water boiling, I’ll wait for a few minutes, and I can usually go back to enjoying the scenery while I wait.
One thing to remember when boiling water: it can take time. If you find yourself in a rush, this method could delay your plans a bit. Just keep your fire going and make sure you have everything set up before you get parched!
How to Boil Safely
Setting up an efficient boiling process is crucial. First up, make sure you’ve got a clean and suitable pot to hold that water, something you can use without worrying about toxins melting into your drink. Camping gear is often designed for this, but if you’re improvising, feel cautiously creative.
Next, keep your fire and the pot steady. Fire tends to just have its own feelings sometimes, especially when the wind kicks in. I always say, find a nice sheltered spot where you can keep the flames going strong.
Lastly, once you’re done, let the water cool before sipping. Trust me; you don’t wanna gulp down boiling hot water and end up with a nasty burn. Patience is key here!
Limitations of Boiling
While boiling is fantastic, it’s not without its limits. First off, it won’t remove chemical contaminants. If your water source is near industrial activities or agricultural areas, boiling might not help much. So it’s important to take a good look at where your water is coming from.
Another thing to keep an eye on is that boiling can use up precious firewood. If you’re in a spot where resources are limited, you might want to save that energy for cooking or warming up instead.
Lastly, don’t forget about the taste! Some folks find boiled water can taste a bit flat. You can always let it cool and add a bit of flavor if that’s your thing. A pinch of salt or some herbs might make your hike a bit more enjoyable!
Using Water Filters
The Benefits of Filtering
Water filters are arguably one of my go-to tools when I’m out exploring. They’re portable, usually lightweight, and super efficient. Filters can remove a range of contaminants, including sediment and bacteria. Plus, they often improve the taste of your water—definitely a bonus after a long day of hiking!
When I use my filter, I love how easy it is. Just scoop up your water and let it pass through. It’s like magic! Many personal filters can handle a surprising amount of water before needing replacement, which is a game-changer for those longer trips.
It’s essential to know that not all filters are created equal, though. Some are designed for wilderness conditions, while others are more suited for treating water that is already relatively clean. So definitely do your homework on what you’re buying!
Setting Up Your Filter
Setting up a filter is usually straightforward. I generally start by checking my filter’s instructions (not the most fun part, I admit!). It’s important to know how to assemble and use it properly so you don’t find yourself in a bind.
You’ll want to attach it to your water container or drink directly from the outlet if you can. I have found that there’s some finesse involved; make sure there are no leaks to avoid wasting good water. Once you’re set up, just collect the water as per the guidelines!
Don’t forget to clean your filters after use; they can get clogged up quickly if you don’t. Keep them washed and stored properly for your next adventure to keep them in tip-top shape.
Potential Downsides of Filters
While handy, filters can have their downsides too. For starters, they generally don’t handle chemicals or heavy metals well, which is another reason to keep an eye on your water source. Depending on your location, you may still catch a nasty illness.
Also, filters can be finicky. If you don’t maintain them, they can jam, leading to a frustrating experience when you’re in a pinch. I’ve had to deal with a slow filter before—talk about an exercise in patience!
Lastly, while many are lightweight, carrying a filter along with all your other gear can add extra ounces to your pack. Just keep that in mind when you’re packing for your trip!
Treating Water with Chemical Purification
Understanding Chemical Purification
Chemical treatments like iodine or chlorine tablets are lifesavers. They’re lightweight and simple to use—just pop one in a bottle of water and wait. I love how efficient they are, especially when I’m carrying a lot of gear and need to conserve weight.
These chemicals work by killing harmful bacteria and viruses. Most of the time, a simple wait of about 30 minutes is all it takes before you’re good to drink! They don’t need boiling water—another big plus when you’re on the go.
However, be aware that chemical purification does come with some flavor drawbacks. Some people find that the taste of iodine is pretty off-putting. I usually carry a little flavoring to help mask those strong tastes when necessary.
How to Use Chemical Purification
When using chemical tablets, start by following the manufacturer’s instructions closely. More tablets don’t mean faster purification, and that could lead you to a bad experience. I usually set a timer and take a moment to relax while I wait for it to do its magic.
Another tip is to mix the water beforehand if you can. Shaking it up ensures that the chemical distributes evenly. Just don’t get too carried away and splash it everywhere—you’ll only have that much water to work with!
Lastly, keep track of expiration dates on those tablets. Old chemicals can lose their effectiveness, and you definitely want your purification methods to be reliable, especially when you’re far from home.
Safety Concerns of Chemical Treatments
While chemical treatments can be effective, they also have their risks. Iodine is not recommended for pregnant women or those with thyroid issues. Plus, prolonged use isn’t advised either, so it’s best for short trips.
Another thing to remember is how chemicals can affect the taste and smell of water. You might tolerate it, but it could be a bit much for guests. This is when carrying some sugar or flavoring can come in handy to make things more pleasant!
Lastly, don’t forget that chemical purification doesn’t address physical contaminants or sediment. So if you’re dealing with muddy or foul-looking water, it’s best to filter or let sediment settle before you drop those tablets in.
Using UV Light Purifiers
The Magic of UV Light
Ultra-violet light purifiers are some truly cool gadgets. They’re compact and efficient, completely taking out bacteria and viruses with their light. No chemicals, no boiling—just light! I can’t tell you how awesome it feels to push a button and know the water is getting zapped.
However, you need to have batteries or a rechargeable source, which can sometimes be a pain to manage when you’re off the grid. I always try to plan ahead and bring extra batteries just in case!
Another thing to watch out for is water clarity. If your water has a lot of particulates, UV light won’t work as well. Turbid water can block the light, so always aim for clearer sources!
How to Utilize a UV Purifier
Using a UV purifier is typically straightforward. First, check to make sure your unit is functioning and the batteries are good to go. It’s also important to have a clear receptacle for the water—some purifiers require drinking bottles, while others can be used in any container.
Then, immerse the UV light in the water for the time specified in the instructions (usually around 30 seconds to several minutes). I love how simple it is—just watch the light and know that you’re treating your water effectively!
Once time’s up, your water is ready to drink. Just give it a quick shake if your purifier allows for that, and you’re set! Easy peasy.
The Limitations of UV Light Purification
Even though UV light is great, it’s not a complete replacement for other methods. Like I mentioned, it won’t deal with sediment and particulates. If your water is cloudy, you should probably filter it before zapping it with UV light.
Also, when using the UV light method, don’t forget that it requires a power source. If you’re camping for an extended time, keeping those batteries charged might become an issue! I usually scope out solar chargers if I think I’ll be relying on it a lot.
Lastly, make sure you’re aware of how long it takes to purify your water. This method can be quick, but if you don’t pay attention, it may hold you back from your plans. Timing is everything, especially when there’s adventure calling!
FAQ Section
1. Is it safe to drink water directly from rivers or lakes?
Not without purifying it first! Natural water sources can contain harmful bacteria and viruses that can make you sick, so always use a purification method before drinking.
2. How long does it take to boil water for purification?
You need to bring it to a rolling boil for at least one minute. If you’re at a higher altitude, run it for at least three minutes to ensure it’s safe.
3. Are chemical purification tablets effective?
Yes, they are effective for killing bacteria and viruses. Just make sure to follow the instructions and check for any health concerns with iodine if that’s what you’re using.
4. What water filter should I use for wilderness camping?
A good backpacking filter is essential. Look for one that’s lightweight and can handle pathogens and particulate matter. Do your research to find a product that’s reputable for wilderness conditions.
5. Can UV light purifiers handle cloudy water?
No, UV light won’t be effective on cloudy or turbid water as particulates can block the light from reaching pathogens. You should always filter the water first if it appears murky.

by Preparation | Aug 2, 2025 | Preparedness
Wound Care and Healing
Using Herbal Compresses
When I think about survival situations, one of the first things that pops into my mind is how to treat wounds. I’ve had my fair share of scrapes and cuts, and herbal compresses truly come to the rescue. Using fresh herbs like chamomile or calendula made into a compress can help reduce inflammation and promote healing.
You can make a compress by steeping the herbs in hot water and then soaking a clean cloth in this infusion. When you press it onto the wound, you’re not just applying moisture—you’re delivering those healing properties right where you need them. I’ve found this method incredibly soothing.
Just a heads-up though, always make sure the wound is clean before applying anything. It’s essential to avoid any kind of infection, which can really complicate healing. Trust me on this—I’ve learned the hard way!
Essential Oils for Disinfection
Essential oils like tea tree, lavender, and oregano come in really handy for disinfection. I always keep a small bottle of tea tree oil with me, as it’s known for its antibacterial and antifungal properties. When faced with a wound, diluting a few drops of the oil with a carrier oil can provide a natural disinfectant without the sting of conventional products.
Application is super easy; just dab it gently with a cotton ball on the affected area. I love the scent of lavender, plus it helps with relaxation—perfect when you’re stressed about being in a tough situation.
But remember, essential oils are potent! Always do a patch test to ensure you don’t have any allergic reactions. I can’t stress this enough; knowing your body’s reactions can make a world of difference.
Nutrients for Accelerated Recovery
Nutrition plays such a critical role in recovery that I can’t overlook it. I make it a point to consume plenty of vitamin C-rich foods like berries and citrus whenever I’m dealing with a wound. They help with collagen production and healing processes. If you can forage or have access to these foods in the wild, don’t skip them!
Additionally, incorporating protein sources like beans or nuts is vital in building new tissues. I’ve relied on nuts for energy and protein on numerous outdoor trips, and they’ve never let me down.
Remember, every little nutrient counts! Your body needs all the help it can get when bouncing back from injuries, so keep that diet packed with natural goodness.
Digestive Aids
Herbal Teas for Upset Stomachs
Upset stomach? Yikes! I’ve been there, especially after being out in nature for a few days with questionable cuisine. That’s when herbal teas come to the rescue. Peppermint or ginger tea can work wonders for soothing digestive issues. Just a few sips can help ease nausea and discomfort.
In the wild, I’ve managed to make ginger tea with wild ginger roots. It’s refreshing and works incredible magic on a troubled tummy. Make sure to steep the ginger properly, and you’ll feel that warm embrace soothing your insides.
And don’t forget about chamomile! That little flower has a calming effect on both your stomach and mind. Perfect combo in a tense situation, right?
Probiotics from Natural Sources
Keeping gut health in check is a survival priority, and fermented foods are packed with probiotics that can really help. Though in a tough situation, options might be limited, look for wild edibles that could have some fermentation properties.
I’ve often found wild dandelion greens—great for promoting digestion. They’re super nutritious, and I like munching on them when I feel off. Plus, they can help with nutrient absorption—so again, totally worth it!
If you have access to yogurt, that’s also a fantastic source of probiotics. Just one serving can boost your gut health immensely. I treat it like liquid gold during my adventures.
Natural Laxatives
In the world of survival, constipation isn’t just uncomfortable; it can actually become a serious issue. That’s why I always keep my eye out for natural laxatives like senna leaves or prunes, which help keep everything moving along.
Senna is a powerful herb that’s been traditionally used for its laxative properties. Just be cautious on dosages; I’ve learned the hard way that a little goes a long way! Steeping senna in hot water is the way to go for a relaxing drink.
And if you can find some wild berries or apples, they’re not only delicious—especially after a rough day—but they’ll also keep your digestive system functioning like clockwork. Easy, natural remedies right from nature!
Respiratory Relief
Steam Inhalation Techniques
Breathing issues? They can really put a damper on your survival situation. I’ve found that steam inhalation can work wonders. Whenever I have a cold or am dealing with congestion, simply boiling water and inhaling the steam can provide immediate relief. Adding a few drops of eucalyptus oil elevates the benefits even more.
To do this safely, I always keep a safe distance from the boiling pot—no one wants a face full of steam burns! Covering my head with a towel creates a mini steam tent that traps all that therapeutic goodness. It’s like a spa treatment wherever you are!
The warmth and moisture also help with throat irritations, which let’s be real, can happen way too easily when you’re out and about. Just give it a try next time you feel stuffy.
Natural Expectorants
If you’ve got a phlegmy cough, nature’s got your back! Some herbs like thyme and peppermint work as natural expectorants. I usually brew a strong herbal tea from these plants when I feel my throat getting scratchy. They’re not just soothing; they help loosen mucus too!
Making a simple syrup from honey and thyme is another trick I keep in my toolkit. If you’ve never tasted it, you are missing out! Not only is it sweet and enjoyable, but it works brilliantly to ease throat discomfort.
So next time you’re feeling under the weather, turn to your local herbs and see what they can do to help you breathe easier!
Herbal Cough Syrups
When I’m dealing with a nagging cough, I’ve found that homemade herbal cough syrups work wonders. Combining honey with herbs like marshmallow root or slippery elm creates a soothing mixture that coats the throat. It’s a game-changer for those stubborn coughs!
This is super easy to make—just mix the herbs with honey and let it infuse over a couple of days. I’ve even improvised with other sweeteners when honey wasn’t around, and it still did the trick. The key here is to keep it natural and gentle while soothing your throat.
It’s pretty cool knowing that I can whip up something effective from my surroundings or pantry, rather than relying on store-bought options that might not even be handy in a pinch!
Skin Care for Harsh Conditions
Natural Sunscreens
When you’re out in nature, protecting your skin from harsh sun rays is non-negotiable. I’ve experimented with various natural sunscreens using ingredients like coconut oil infused with shea butter and zinc oxide. It’s not only effective but also moisturizing, which is a bonus!
Mixing a little bit of carrot seed oil into the blend gives it added sun protection benefits. You can easily create a homemade sunscreen in a jar and warm it up before applying it as needed. I swear by applying this every few hours, especially during long hikes or outdoor activities.
But always remember to patch test any new concoctions on your skin before slathering it on. The last thing you want is a reaction that could ruin your adventure!
Moisturizers from Nature
Harsh environments can lead to dry, cracked skin, which is where natural moisturizers come into play. I’ve often used shea butter or even plain coconut oil to keep my skin hydrated. They’re simple yet incredibly effective and totally safe for sensitive skin too.
In addition, if you find aloe vera while out there, grab it! The gel is fantastic for soothing sunburns or dry patches. Trust me; I’ve turned to the aloe plant more times than I can count, and it never lets me down.
Making sure your skin stays soft can help avoid further complications or infections, so make this a priority when you’re in survival mode.
Natural Insect Repellents
Insects can really make survival situations harder, especially mosquitoes. I learned how to whip up natural repellents using essential oils like citronella and lemongrass mixed in carrier oils. Applying this blend, not only keeps the bugs away, but it smells good too!
I’ve also used witch hazel mixed with essential oils as a spray. It’s light, refreshing, and really practical. If I can’t find any ready-made version, this DIY spray comes in handy to keep those pesky insects at bay.
Remember, reapplication is key! These natural options might not last as long as chemical ones, but it’s still worth it to avoid those nasty bites.
FAQs
1. What are the best natural remedies for treating wounds?
Using herbal compresses, essential oils for disinfection, and ensuring good nutrition can greatly aid in wound healing.
2. How can I soothe an upset stomach naturally?
Herbal teas like peppermint or ginger are fantastic for settling stomach issues. Also, looking for wild edibles that can aid digestion is beneficial.
3. What should I do about respiratory issues while in the wild?
Steam inhalation and herbal expectorants, as well as making your own cough syrup with honey and herbs can help ease respiratory discomfort.
4. How can I protect my skin from the sun naturally?
Natural sunscreens made from coconut oil, shea butter and other ingredients provide a great barrier against sun damage while moisturizing your skin too.
5. What are some effective natural insect repellents?
Essential oils like citronella and lemongrass, mixed in a carrier oil or witch hazel, work effectively to keep insects at bay.

by Preparation | Jul 31, 2025 | Preparedness
We’ve all been there—unexpected expenses pop up and suddenly, it feels like the world is caving in on our finances. Personally, I’ve faced my share of financial crises, and let me tell you, it’s a wild ride. But over time, I’ve learned some valuable lessons on how to prepare and protect myself from going broke during tough times. Let’s dive into the strategies that I’ve found helpful over the years.
Build an Emergency Fund
Understand the Purpose of an Emergency Fund
When I first heard about an emergency fund, I thought, “Do I really need that?” But then life tossed me a few curveballs—unexpected car repairs, medical bills, you name it. An emergency fund is essentially your safety net. It provides peace of mind knowing that you have money set aside for emergencies, so you’re not scrambling to find cash in a crisis.
The idea is simple: set aside enough money to cover at least three to six months’ worth of living expenses. This way, if something goes wrong, you’re prepared. It’s like having a cushion for when things get bumpy.
Plus, it helps you avoid putting expenses on credit cards or borrowing from friends and family, which can create additional stress and complications.
How to Start an Emergency Fund
Getting started is easier than you might think. First, take a look at your monthly expenses. Create a realistic budget that highlights where you might be able to pull some cash aside. I started out with small, manageable contributions—like skipping that extra venti latte each week!
Automating your savings can be a game-changer. Set up a regular transfer from your checking account into your savings account. This way, you won’t have to remember to do it—it just happens. Before you know it, you’ll see your emergency fund growing.
And don’t forget to celebrate your small wins! Each time you hit a savings milestone, treat yourself to something nice (but not too pricey). This makes saving feel rewarding rather than a chore.
Keep Your Fund Accessible yet Secure
Now, while it’s important to have your fund accessible, you don’t want to mix it up with your daily spending money. I recommend keeping your emergency fund in a high-yield savings account. This way, you can earn a little interest while still having quick access when you need it.
Just remember: this money is for emergencies, not for that cute handbag or the latest gizmo. Being disciplined about its use is key. I’ve had to remind myself, “This is for when life happens, not just when I feel like treating myself.” You’ve got this!
Reduce Debts Wisely
Assess Your Debt Situation
Debt can feel like a heavy weight on your shoulders. Trust me; I’ve been there. Before anything else, take a clear inventory of your debts. List everything out—credit cards, student loans, mortgages—whatever it is, get it down on paper. This clarity helps you understand just how much you’re dealing with.
Different types of debt can have different interest rates and terms, so knowing the details is crucial. It gives you a roadmap for repayment strategies down the line. Plus, it’s empowering to see the full picture—it’s the first step in taking control.
Don’t forget to reflect on what led to your current debt situation. This doesn’t mean berating yourself; think of it as learning from your past. What decisions can you change moving forward?
Create a Debt Repayment Plan
Once you have that assessment, it’s time to make a game plan. One technique I swear by is the snowball method: pay off your smallest debts first while making minimum payments on the others. There’s something super motivating about crossing that first debt off the list!
Alternatively, if you’ve got high-interest debt, consider the avalanche method. Tackle those high-interest debts first and save the most cash in the long run. Whichever method you choose, just get started! Action is the key here.
And remember to stay consistent. Set reminders to track your progress and adjust your plan if necessary. Life happens, and it’s okay to tweak things as you go. The goal is to keep moving forward!
Avoid Accumulating New Debt
As you work on reducing your current debts, it’s equally important to avoid adding new ones. I had to challenge myself to only use credit for planned purchases, and I stuck to it. If it wasn’t in the budget, it wasn’t happening.
Leverage cash instead of credit; believe me, there’s something satisfying about handing over cash and watching your spending limit right there in your wallet! Plus, it helps you stay conscious of how much you’re really spending.
Alongside this, consider building a lifestyle that encourages saving rather than overspending. Trust me, it opens up so many possibilities for financial freedom down the line!
Diversify Income Sources
The Importance of Multiple Income Streams
Having multiple sources of income has saved my bacon more than once. Whether it’s a side hustle, freelance work, or passive income, diversifying your income can provide security. It’s like having little safety nets scattered across your financial landscape.
In my experience, starting a side hustle doesn’t always mean turning your entire life upside down. Look for skills or passions you can monetize. For instance, I turned my love for writing into freelance gigs, and it has proven to be incredibly rewarding—both creatively and financially.
Don’t underestimate the power of passive income too! Whether it’s renting out a room, dividend stocks, or creating an online course, there are countless ways to grow your income streams. Get creative with it!
Explore Gig Economy Opportunities
In today’s gig economy, opportunities abound. Apps and platforms like Uber, Fiverr, and TaskRabbit can connect you to quick gigs whenever you have some extra time. I often pick up tasks on weekends or when I have a free hour here and there—it’s a fantastic way to bolster my income without committing to something long-term.
Experiment with different roles to find what fits your lifestyle and interests. Not only can this give you extra cash, but it can also lead to potential career changes or new skills you never expected to acquire!
And if there’s something you’re passionate about—like art, cooking, or coaching—why not try turning it into a side business? The possibilities are endless.
Invest Smartly
When it comes to diversifying income, investing is a powerful ally. In my journey, I’ve learned that even small investments can grow over time. Whether it’s stocks, mutual funds, or real estate, educating myself on different investment options has paid off tenfold.
Start small if you’re unsure—consider a robo-advisor for guided investment choices. And remember: the earlier you start investing, the more time your money has to grow!
Keep in mind that investing involves risks, so make sure to do your research and consider what fits your risk tolerance. Get in the habit of continuously learning about investment strategies to sharpen your skills further.
Stay Informed and Adaptable
Continuous Financial Education
Staying informed about personal finance is crucial. Over the years, I’ve made it a routine to read books, follow experts, and listen to podcasts. Financial literacy is the best form of self-defense against financial crises, in my opinion.
The world of finance is ever-evolving. New investment strategies, savings tips, and financial tools pop up frequently. Keeping up with these changes can make a world of difference in how I approach my own financial planning.
Consider joining online communities or forums dedicated to finance. Sharing insights with others and learning from different experiences can be invaluable. It’s like having a support system on your financial journey.
Track Financial Trends
Understanding broader financial trends can help you remain adaptable. For instance, keeping an eye on economic indicators, interest rates, and stock market fluctuations can provide insights that impact how you manage your funds. I often find myself watching financial news a few times a week to stay updated.
This knowledge empowers me to make more informed financial decisions—whether it’s knowing when to invest, when to save, or when to adjust my budget based on inflation, for example.
And if you’re not into traditional news outlets, look for financial apps that provide real-time updates and alerts about changes that could affect your financial situation. Stay plugged in!
Adjust Plans as Life Changes
Life is unpredictable. I’ve learned to embrace change and adapt my financial plans as needed. Whether it’s a new job, a change in family dynamics, or relocating, adjusting my budget and savings plans accordingly has kept me afloat during turbulent times.
Be proactive rather than reactive. Regularly review your financial goals and make any necessary adjustments. This habit ensures I’m always prepared, no matter what life throws my way.
Flexibility—it’s not just a yoga term, folks! In finance, being flexible means keeping a cool head and finding new paths when needed.
Seek Professional Advice
When to Consult a Financial Advisor
There’s no shame in asking for help! If you’re feeling overwhelmed, reaching out to a financial advisor can provide clarity and direction. I’ve done this a few times, and honestly, it’s been a game changer. Advisors are trained to see the bigger picture and offer personalized strategies.
They can help you assess your investment strategies, create a retirement plan, or even work through debt management. Choosing the right advisor makes all the difference. Look for someone reputable, ideally a fiduciary who puts your interests first.
And don’t forget, these consultations don’t have to break the bank. Many offer a free initial consultation, which can give you valuable insights without the commitment of a full service right away.
Utilizing Online Resources
If you can’t swing professional help yet, there are loads of online resources available. Websites, forums, and financial apps offer a wealth of information, often for free! I’ve found success with budgeting apps that guide me in tracking expenses and improving saving habits. They’re super handy!
Online courses or webinars can also offer guidance on specific topics—whether it’s investing basics, retirement savings, or tax strategies. I recommend dedicating some time to explore these resources to empower yourself.
Knowledge is a powerful tool; the more informed you are, the better decisions you can make. Take advantage of the resources at your fingertips!
Networking with Financial Peers
Believe me when I say networking can provide insights that professionals might overlook. Engage with others in financial wellness groups, online forums, or local meetups. Sharing experiences and strategies can open your eyes to new paths and resources you hadn’t considered before.
Talk about your financial goals and challenges with trusted friends or family. Those discussions often lead to helpful tips or support that can make a world of difference during tough financial times.
Remember, you’re not alone on this financial journey. Connecting with others who face similar challenges can provide motivation and accountability!
Frequently Asked Questions
1. How much should I have in my emergency fund?
It’s generally recommended to save three to six months’ worth of living expenses. This amount can vary based on your personal situation, risk tolerance, and job stability.
2. What is the best approach to paying off debt?
Two popular methods are the snowball method (paying off smallest debts first) and the avalanche method (paying off high-interest debts first). Choose the one that fits your motivation style best!
3. How can I find additional income opportunities?
Explore freelance gigs, side hustles, or even renting out a room on services like Airbnb. The gig economy is booming, and there’s plenty of opportunities waiting for you!
4. What should I do if I can’t save money each month?
If saving feels impossible, start small. Even setting aside a tiny amount can add up over time. Look for areas in your budget to cut back, even if it’s just a little at first.
5. When should I consider hiring a financial advisor?
If you’re feeling overwhelmed with your finances, a financial advisor can provide tailored advice and strategies. It’s especially useful during life changes, such as starting a family or nearing retirement.
by Preparation | Jul 31, 2025 | Preparedness
Stay Calm and Assess the Situation
Take a Deep Breath
First things first, when you get bitten, it’s easy to freak out. Trust me, I’ve been there! But taking a moment to breathe can make a world of difference. Just like in a heated moment in life, staying calm allows you to think more clearly and decide what to do next.
After a bite, our instinct might be to panic – to run to a mirror or shout for help. Instead, focus on your breathing. Count to four as you inhale, hold for four, then exhale for four. This grounding technique can help curb that immediate anxiety and prepare your mind for the next steps.
Once you’re a bit calmer, take a moment to really assess the situation. Look closely at the bite. Is it bleeding? Are there signs of a sting? This assessment will help determine if you need to seek medical help or if you can treat it yourself.
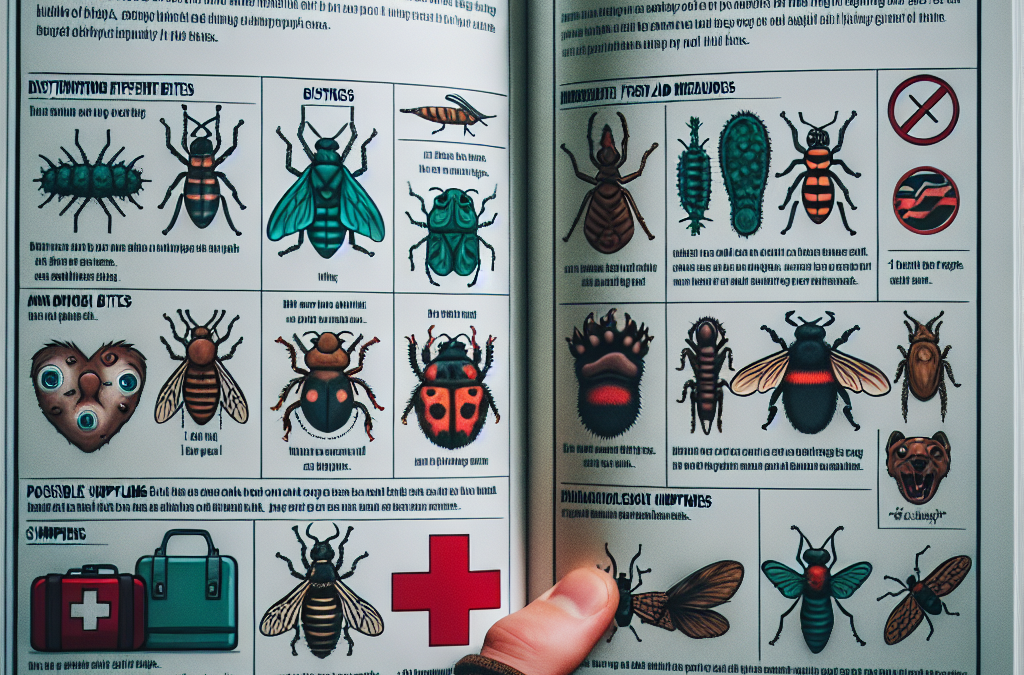
Evaluate the Type of Bite
Next up, identifying what type of bite or sting you’re dealing with is crucial. Animal bites, insect bites, and stings from bees or wasps all have different implications. Sometimes, it’s easy, like a bee sting, but other times, things can get tricky.
If you’ve been bitten by an animal, try to remember the type. Was it a dog, cat, or something wild? Domestic animals’ saliva might require different treatment compared to wild animals, which can carry various diseases.
Insect bites can vary hugely in their effects, too. For instance, a mosquito bite might just be itchy, while a spider bite could lead to more serious complications if it’s venomous. Getting a clear picture will help in your response.
Check for Allergic Reactions
One of the scariest parts of bites is the possibility of an allergic reaction. I can’t tell you how many times I’ve seen my friends jump into action with a bee sting, only to find out they have an allergy. Keep an eye out for symptoms like swelling, difficulty breathing, or hives.
If you notice any of these signs, it’s essential to act fast! Call for help or take an antihistamine if you have one on hand. Allergy severity can sometimes escalate quickly, so don’t hesitate.
Even if you haven’t experienced reactions in the past, that doesn’t mean it can’t happen now. Always err on the side of caution and keep an EpiPen close if you know you’re at risk.
Administer First Aid
Clean the Area
After you’ve assessed the situation, it’s time to take action. First, cleaning the area is crucial. You don’t want to risk infection on top of your bite, so make sure you wash your hands and the affected area with soap and water.
If you have an antiseptic handy, even better! Apply it gently, giving it a moment to dry before moving on to the next steps. I’ve learned the hard way that skipping this can lead to more trouble down the line.
After cleaning, be sure to cover the area with a clean bandage if it’s bleeding or at risk of getting dirty. You want to create an environment that promotes healing – and that starts with cleanliness!
Control Swelling and Pain
If the bite is swelling or painful – and let’s be honest, many of them can be – controlling that discomfort is next on my list. Cold packs or ice wrapped in a cloth can work wonders for reducing inflammation.
Applying it intermittently for about 15-20 minutes can take down that swelling and numb the pain. Just be careful not to put ice directly on your skin; we don’t want frostbite added to our woes!
If you have over-the-counter pain relievers like ibuprofen or aspirin, those can help too. Always follow the dosage instructions! Some people forget how potent these meds can be.
Monitor Symptoms Over Time
Lastly, monitoring your symptoms is key. Just because you feel better at first doesn’t mean it can’t change later on. It’s so important to pay attention to how your body reacts in the hours and days that follow.
Keep an eye out for any new symptoms, and if things seem to worsen, don’t wait to get help. Your health is way more important than hesitating. I’ve made that mistake, and it didn’t end well!
Documenting your progress can also be helpful, especially if you need to see a doctor later. Take photos and write down any symptoms that arise – it can provide the professionals with valuable information.
When to Seek Medical Attention
Signs of Infection
Sometimes, despite all our best efforts, infections can set in. If you notice increased redness, warmth, or pus around the bite area, that’s a significant red flag. Infections can escalate quickly, so don’t wait it out!
Additionally, if you’re running a fever or experiencing chills, those can be more signs that something isn’t right. Not to mention, feeling unusually tired can also indicate that your body is fighting off an infection.
In these cases, it’s best to reach out to a healthcare professional, who can evaluate the situation and provide the right treatment. Don’t downplay these signs; it’s better to be safe!
Allergic Reaction Symptoms
If you experience any signs of a serious allergic reaction, such as difficulty breathing, swelling in the face or throat, or a rapid heartbeat, time is of the essence. Call emergency services immediately. Every second matters when it comes to allergy symptoms!
These kinds of symptoms require an urgent response, and having someone to help can make a significant difference. I can’t stress enough how crucial it is to recognize these signs early on. Knowing your risks and what to look out for can ultimately save you from serious harm.
Even if you have treated smaller bites in the past, know that allergy reactions can change. Don’t be complacent – always be prepared for the unexpected!
Persistent Pain or Other Symptoms
Sometimes, even if everything seems normal, you may still feel lingering pain, numbness, or other symptoms after a bite. If pain doesn’t subside or the area feels increasingly tense, don’t hesitate to seek medical advice.
It’s better to go to a professional just to be sure everything is fine. They can offer insights or treatments that will help ease your pain and ensure you’re heading toward a full recovery.
Don’t let pride hold you back! Reaching out for help shows strength and responsibility towards your health, something I believe is essential in our busy lives.
Prevention Tips
Stay Informed About Local Wildlife
As someone who loves the outdoors, knowing about local wildlife and insects can really help prevent bites. Research the common animals and insects in your area, especially if you’re heading somewhere new. You’ll feel much better prepared!
I’ve read horror stories of people hiking and running into venomous snakes or aggressive wildlife. Taking your time to understand what to expect can help you enjoy your adventures even more. Awareness can spark caution!
Additionally, taking note of the seasons and weather can be crucial too. Some pests are more active during warmer months. Planning your outings when they’re less active can truly save you a world of hurt!
Use Repellents When Necessary
When it comes to being outside, using repellents can be a game-changer. Bug spray with DEET, picaridin, or oil of lemon eucalyptus can help fend off those pesky insects. I’ve made it a habit to apply it before I step out, especially on hikes or camping trips.
Don’t just apply repellents to exposed skin – think about your clothing too! Special clothing meant to keep bugs away can be a fantastic investment if you’re in an area with high insect activity. I surely wish I had learned about those sooner!
Always follow the instructions for safe usage, and reapply as indicated, especially if you’re sweating or in water. A few minutes of preparation can save you hours of discomfort later!
Practice Caution in Vegan Areas
Many insects are attracted to food, so practicing caution around picnics or outdoor meals can help you avoid bites. Whenever I go for gatherings outside, I always try to keep food sealed and put away until I’m ready to eat.
Trash cans and food scraps can draw unwanted insects. Keeping your area tidy can help deter these pests. I also like to avoid sweet-smelling lotions or perfumes before heading to such events – they can attract the wrong crowd!
Lastly, when hosting an outdoor event, consider informing your guests about the precautions. It’ll keep everyone aware and help minimize potential bites. A little teamwork goes a long way!
Frequently Asked Questions
What should I do immediately after an animal or insect bites me?
First, try to stay calm. Clean the bite area with soap and water, apply an antiseptic, and then monitor for any symptoms and swelling.
How can I tell if my bite is infected?
Signs of infection include increased redness, warmth, swelling, pus, or fever. If you notice any of these, seek medical attention.
What are the symptoms of an allergic reaction to a bite?
Symptoms can include difficulty breathing, swelling of the face or throat, hives, and rapid heartbeat. If you experience these, seek emergency help immediately.
When is it necessary to go to the doctor?
If you experience severe symptoms, persistent pain, or signs of infection after a bite, it’s best to contact a healthcare professional for advice and treatment.
How can I prevent insect or animal bites?
Stay informed about local wildlife, use insect repellent, and be cautious with food when outdoors. Keeping these tips in mind can help reduce your risk of bites.


