by Preparation | Jul 31, 2025 | Preparedness
Assessing Your Food Supply
Check Expiration Dates
Alright, first things first—let’s take a good look at what you’ve got in your pantry and fridge. The first step is to check those expiration dates on everything. This may seem tedious, but trust me, it’s totally worth it when you’re staring down the barrel of a blackout.
Don’t just shove items to the back and forget about them! You’d be surprised how quickly stuff can go bad. Make a little checklist if you need to. This way, you won’t get stuck with expired food when you might really need it.
Once you’ve got everything sorted, make sure to toss out anything past its prime. There’s no sense in keeping items that could potentially make you sick. Your health is the priority!
Organizing Your Coolers
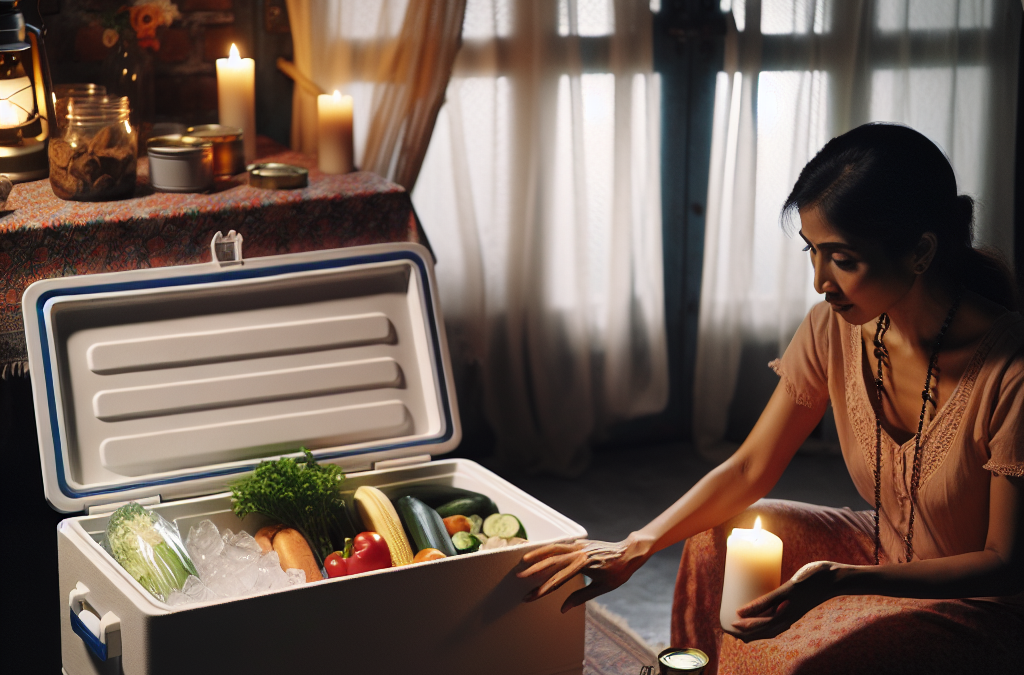
Now that you’ve checked for expiration dates, it’s time to gather your coolers. Yes, those plastic boxes that just sit in the garage most of the time! If the power goes out, these will be your best friends. I like to keep a couple handy for emergencies just like this.
Fill them up with ice or frozen gel packs before a blackout hits. If your power is out for an extended period, you can use the cooler to keep essential items cold—like milk, meat, and leftovers. Just make sure you have everything form-fitted to avoid any mess. Ain’t nobody got time for that!
Also, try to minimize how often you open the cooler. Each time you pop that lid, you let cold air escape, which can raise the temperature inside. A little patience here goes a long way!
Prioritize Food Storage
If you have a deep freezer, take advantage of it. Fill it with essential items! But here’s the trick: always remember to keep it as full as possible. A full freezer will maintain its temperature longer than a half-empty one.
In the unfortunate event that the power shuts off, don’t open the deep freezer unless it’s absolutely necessary. Most full-freezers will keep food frozen for about 48 hours if kept closed. That’s some solid insulation work!
If you suspect that the blackout is going to last longer than 48 hours, consider cooking some of the food in advance. This way, you have meals ready to go, and you won’t end up losing anything important.
Keeping Track of Food Temperatures
Using a Thermometer
Okay, let’s talk about temperatures. This is super important! Investing in a good refrigerator thermometer is one of the best things you can do. I can’t stress enough how vital it is to know exactly what’s going on inside your fridge.
You should aim to keep your fridge below 40°F (4°C). If it goes above that, you might need to toss out some items, especially perishables. So make sure to keep that thermometer handy and check it frequently.
If you don’t have a thermometer, just know that if the fridge is cool to the touch, you’re probably in the clear. But just remember, a solid thermometer takes the guesswork out of the equation!
Timing is Everything
Another great tip is to write down when the power goes out. This can help you keep track of how long your food has been out of refrigeration. The general rule? If the food has been exposed to temperatures above 40°F for more than two hours, it’s safer to throw it away.
Keep an eye on your food and check the temperature regularly. Trust me, it’s a small effort that can save you from a nasty case of food poisoning later on.
Also, having a timeline helps when connecting with your friends or neighbors. You can all team up to track your food safety—safety in numbers!
Communicating with Power Providers
Don’t forget about the importance of keeping in touch with your local power provider. If you know a blackout is on the way, call them to get updates. They can give you an idea of how long you might be in the dark.
A lot of providers these days have apps or websites where you can report outages and get real-time updates. This can be a huge help in planning how to manage your food storage strategically.
Staying connected will definitely help ease your mind and allow you to make effective decisions when it comes to your food supply during uncertain times like a blackout.
Utilizing Emergency Meal Kits
Stocking Up on Essentials
If you haven’t already thought about it, having an emergency meal kit is a game-changer. I’m all about being prepared. Canned goods, dried foods, and any non-perishables should be your go-to items.
Make it fun! Try to involve your family in picking out foods they like. When they help, they’ll be more inclined to eat them when the time comes. Plus, a little teamwork goes a long way in stressful situations like a power outage.
Don’t forget about water, either. Every person needs at least a gallon a day, so stock up accordingly. It’s amazing how fast it can disappear when you least expect it!
Creating Balanced Meals
It’s not just about having food, but also about having nutritious food! When setting aside your emergency kit, think about the balance. Include protein, grains, and some fruits or vegetables if possible.
When you’re making your emergency kit, aim for foods that can be easily cooked over a camp stove or even eaten straight from the can. I mean, who wants to cook during a blackout?
Give some thought to including comfort foods as well. In those moments when things get a bit overwhelming, a little taste of home can help lift spirits. Choose wisely, my friend!
Regularly Review Your Kit
Lastly, don’t just toss everything in a box and forget about it. You need to check your emergency meal kit regularly! I like to do this every few months. Check expiration dates and refresh your stock as needed.
Sometimes the things you thought weren’t going to expire for ages suddenly turn into little time bombs of stale food. Keeping your kit updated is crucial for spending those unexpected blackout hours worry-free.
Plus, it’s a great excuse to have a little fun with food! Try out new recipes, taste-test some items, and who knows—you might even discover a new favorite meal for future emergencies!
FAQs
1. How long can food stay safe during a blackout?
Generally, a full freezer can keep food frozen for 48 hours if the door remains closed. A refrigerator will keep food safe for up to 4 hours if it stays closed.
2. What should I do with food in the fridge during a blackout?
If the power is out for more than 4 hours, check the temperature. If it’s above 40°F for two hours or more, it’s best to toss it.
3. How can I keep food cold without power?
Use coolers packed with ice or frozen gel packs. Limit how often you open them to keep the cold air inside.
4. Are emergency meal kits necessary?
Absolutely! Having an emergency meal kit ensures you have safe, non-perishable food available during unexpected outages.
5. When should I replace food in my emergency kit?
Check your emergency kit every few months and replace items as needed before their expiration dates. Keeping it updated is key!


by Preparation | Jul 31, 2025 | Preparedness
Understanding the Basics of Foraging
What is Foraging?
Foraging for edible plants and mushrooms is one of the most exhilarating and rewarding outdoor activities you can engage in. Imagine strolling through a forest or meadow, knowing that nature is a buffet of goodies just waiting for you to discover them! It’s a fantastic way to connect with nature, but it does come with its own set of rules. Safety is key—both for your health and for the environment.
Learning the basics involves more than just recognizing a few mushrooms or handy plants. It’s a mix of knowledge, instincts, and a good bit of practice. There are many edible plants that look similar to toxic ones, making it all the more important to get your identifications right. Getting familiar with the bell curve of foraging will really set you up for success!
I always say, start small! You don’t have to become an expert overnight. Aim to learn a handful of common plants and mushrooms each season. It’s all about building your foraging knowledge little by little, building confidence along the way.
Identifying Edible vs. Toxic Species
The Importance of Research
Before you even dream of plucking a plant or mushroom, you’ve got to hit the books—or the internet, rather! Doing your research can literally be the difference between a tasty snack and a trip to the emergency room. Start with reliable guides or apps specifically designed for foragers. I always keep one in my backpack for quick reference.
Look for field guides with clear images and detailed descriptions of edible species. Make sure to emphasize local flora since plants can vary greatly depending on your geographical location. It’s also helpful to join local foraging groups. Catching up with experienced foragers can provide invaluable knowledge and tips.
And don’t forget—many edible plants have toxic look-alikes. For example, the good old wild carrot can be confused with poison hemlock. Take your time to learn the differences, and remember: it’s better to miss out on a meal than take a risky bite!
Best Practices for Foraging
Respecting Nature
When I head out foraging, I always carry a “leave no trace” mentality. This means being respectful of the environment by not over-harvesting. I usually only take what I need and leave enough for wildlife and for the plant to continue growing. It’s our responsibility to ensure that future generations can enjoy the same bounty.
Staying on trails when foraging and avoiding areas that seem to have a lot of pollution or runoff is also a good practice. You don’t want to sunset your mushroom soup with toxic waste! It’s all about being a good steward of nature while enjoying the outdoor spoils.
Another good practice is to ensure proper harvesting techniques. For example, when picking mushrooms, use a knife to cut them at the base rather than pulling from the ground. This helps preserve the mycelium so it can grow back next season.
Techniques for Collecting Edible Plants and Mushrooms
Gathering Tools and Tips
When I go foraging, I’ve found it really helps to have the right tools at my disposal. A nice basket is a must! It allows for proper air circulation, which is super important to keep your finds fresh. A small knife is also essential for cutting mushrooms and tricky plants. I’ve learned to avoid plastic bags since they can turn into a sweaty mess, ruining your beautiful finds.
Keep a notebook handy to jot down where you found what! This way, you can revisit your favorite spots without having to rely on memory. It’s also a great way to track the seasonal changes of your local flora—some plants can be foraged in varying seasons.
And don’t skimp on safety gear! Having gloves and a suitable first aid kit is a smart move, just in case you accidentally encounter nettles or anything prickly. I’ve had my share of scrapes while being too eager on my hunt!
Cooking and Enjoying Your Foraged Finds
Preparing Edible Plants and Mushrooms
Now, here’s where the fun really begins! After gathering edible plants and mushrooms, the next step is preparing them for delicious meals. Wash them thoroughly to get rid of any dirt or bugs. I always soak them in cold water and gently rinse them under running water—being gentle so I don’t bruise the delicate leaves of herbs.
There are endless cooking possibilities with foraged foods, from salads to soups to hearty casseroles. It might feel tricky at first to experiment, but trust me, it’s super rewarding! I always try to incorporate them into simple recipes so I can really taste what nature offers.
Also, don’t be shy about sharing your foraged finds with friends and family. I love to host a little foraging dinner where each dish incorporates something I’ve gathered. Watching people savor and enjoy the flavors while sharing stories about our outdoor adventures is one of my pasta bakes’ greatest joys!
Frequently Asked Questions
What is the simplest way to identify edible plants?
The simplest way to identify edible plants is by using a reliable field guide or foraging app specifically for your region. Always cross-reference multiple sources to ensure accuracy.
Are there any risks associated with foraging?
Yes, there are risks! Mistaking an edible plant for a toxic one can lead to serious health issues. It’s crucial to properly identify each item before consuming anything.
What tools do I need to start foraging?
Some essential tools include a basket for collecting, a knife for cutting plants or mushrooms, and a field guide for identification. Gloves and a first aid kit can also be very helpful!
How can I prepare foraged food?
Preparation starts with a good wash to remove dirt and bugs. After that, you can experiment with various recipes. I recommend keeping things simple to highlight the natural flavors!
Can beginners forage safely?
Absolutely! Beginners can forage safely by starting with easily recognizable and commonly found plants or mushrooms. Join local foraging groups or take guided tours to gain confidence!
by Preparation | Jul 31, 2025 | Preparedness
Planning Your Outdoor Toilet Location
Choosing the Right Spot
When it comes to building an outdoor toilet, the first step is picking the right location. I usually scout for a spot that’s remote enough to provide privacy yet close enough for convenience. Think about accessibility—especially for family gatherings or camping trips. You don’t want to trek miles just to use the loo!
It’s also essential to consider factors like drainage and wind direction. Placing the toilet downwind from your main living area can make a huge difference in comfort. And don’t forget about natural features like trees or bushes for added seclusion.
Lastly, I recommend checking with local regulations. Some areas have specific guidelines about distance from water sources or property lines. A little research here can save you from unwanted headaches down the line!
Planning for Waste Management
Next up on my list is how we’re going to handle waste. I’ve found that composting toilets are an effective option, especially if you’re keen on sustainability. They’re eco-friendly and can be surprisingly easy to maintain.
If composting isn’t your jam, check out traditional pit toilets. Just make sure the pit is deep enough (about 5 to 6 feet is ideal) and situated well to avoid contamination of groundwater. It’s all about making sure that what goes in, stays safe!
Another option I’ve considered is using a portable camping toilet. These can be a perfect solution for short-term needs and are usually much easier to set up and maintain, especially for the less handy among us!
Gathering Materials and Tools
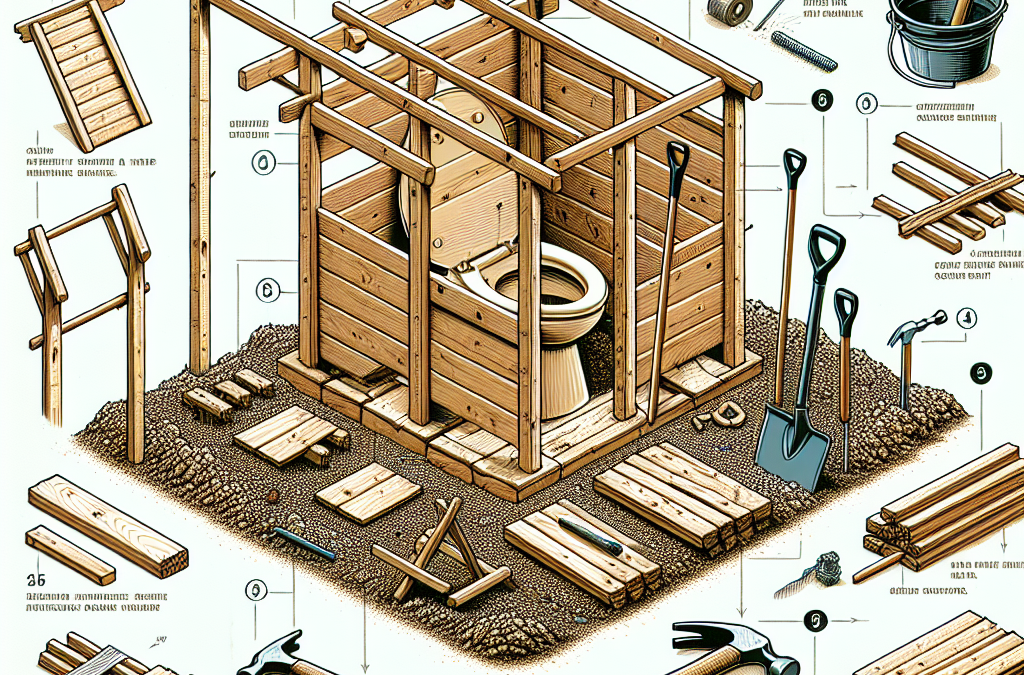
Once I have a plan, the next step is gathering materials and tools. Trust me, nothing brings your project to a screeching halt like missing supplies. For the structure, I typically choose wood or durable plastic. If you’re feeling adventurous, you can also explore recycled materials!
As for tools, I’ve learned that having the basics like a saw, hammer, and measuring tape handy makes a world of difference during the build. I also recommend grabbing a shovel, especially if you’re digging a pit. And let’s not forget about nails and screws for assembly!
Gathering everything beforehand means you won’t need to make multiple trips to the store, which can definitely save time and sanity during the process.
Building the Structure
Constructing the Base
The base is where it all begins! I usually start with leveling the ground where the toilet will sit. This ensures that the whole structure is steady. I’ve made the mistake of skipping this step before—it didn’t end well!
Once I have a solid base, I construct a simple frame using treated lumber. This helps protect against rot and insect damage. I can’t tell you how many times I’ve wished I’d thought of this earlier in past projects!
Raising the base a bit off the ground also allows for better drainage and keeps things clean. I love a clean outdoor loo, don’t you?
Framing and Roofing
Next, I move on to framing the sides. I like to keep it simple—two-by-four studs are my go-to for strength and durability. Plus, they’re easy to nail together. It’s a quick way to get that classic cabin feel!
When I think about the roof, I often choose a slanted design. This helps with rain runoff and keeps everything dry inside. I’ve learned that a roof can make or break your outdoor toilet experience, so don’t skimp on this part!
Covering the roof with metal or shingles provides extra protection against the elements. After all, we want this toilet to last for years, right?
Finishing Touches
No outdoor toilet is complete without some finishing touches! I love adding a door for privacy. A simple latch is key here—it keeps everything secure, helping you to feel comfortable.
Don’t forget ventilation! Trust me, you’ll be grateful for this when the weather heats up. I usually install a small vent near the top of the structure. It helps keep odors at bay.
Finally, I like to decorate a bit—maybe some plants or a little sign to make it feel welcoming. It’s all about creating a space that’s functional yet inviting!
Maintaining Your Outdoor Toilet
Regular Cleaning
Now that the hard work is done, let’s talk maintenance. Regular cleaning is key. I like to set a schedule to keep mine fresh. A quick rinse down and a thorough scrub can work wonders. Plus, it’s so much easier than letting it linger!
I also recommend keeping cleaning supplies handy, like biodegradable soap and a scrub brush. That way, it’s a breeze to tackle messes when they happen. Nobody wants to deal with an overflowing toilet, right?
And while I’m at it, I often remind friends and family to keep it tidy after use. A friendly reminder goes a long way in maintenance!
Waste Management Practices
Depending on your waste management choice, regular checks are essential. For composting toilets, I like to monitor the composting process. It’s amazing how quickly waste breaks down! I make it a habit to turn the compost every once in a while to speed things up.
If you’re using a pit toilet, ensure that it doesn’t get too full. You might need to dig a new pit or cover the old one and start fresh after a few years. This is all part of ensuring a safe outdoor toilet that won’t contaminate your space!
Whatever system you choose, being proactive can make all the difference. Know your limits and don’t be afraid to reach out for help if needed!
Seasonal Considerations
Depending on where you live, I recommend adjusting maintenance routines seasonally. For instance, if you’re in an area with cold winters, insulating your outdoor toilet might be a good idea to protect against freezing.
Once the snow melts, don’t forget to check for any seasonal damage. Weather can be unpredictable, and a little inspection can help prevent bigger issues down the road.
In summer, I like to ensure good ventilation and keep the area around the toilet clear of debris. This can make a significant difference in keeping the space inviting and fresh!
FAQs
1. How do I choose the right location for my outdoor toilet?
Look for a private spot that’s accessible, away from any water sources, and downwind from your living area. Make sure it complies with local regulations too!
2. What materials do I need to build an outdoor toilet?
You’ll typically need wood for the structure, a shovel for digging, screws and nails for assembly, and some roofing material to keep it dry. Don’t forget about cleaning supplies!
3. How often should I clean my outdoor toilet?
I recommend cleaning it regularly—at least every couple of weeks or after heavy use. Be sure to have cleaning supplies and tools handy for easy maintenance!
4. Can I use an outdoor toilet year-round?
Yes, but you’ll want to consider weather conditions! Insulating it for winter and ensuring good ventilation for summer can help it last longer and remain comfortable.
5. What’s the best waste management system for an outdoor toilet?
It varies based on personal preference. Composting toilets are great for sustainability, while pit toilets can be efficient for longer-term setups. Choose what fits your needs best!


