Let me tell you, staying hydrated in extreme heat isn’t just something you should think about—it’s vital. When the temperature soars, our bodies are constantly sweating to cool down. If we’re not drinking enough water, we can become dehydrated quick, which can lead to some serious issues like heat exhaustion or even heat stroke. You’ve got to make hydration your best friend when facing hot conditions.
Water is the best choice, no doubt about it. Avoid sugary drinks and caffeine, as they can actually dehydrate you. I’ve learned the hard way that grabbing a soda might sound refreshing, but it doesn’t do my body any good in the heat. So, stick to plain old water and maybe some electrolyte drinks if you’re sweating a lot—they can really help replenish what you’re losing.
One tip I often share is to set reminders on your phone to drink water, especially if you’re busy. I carry a reusable water bottle everywhere. Just having it within reach makes it way easier to remember to sip throughout the day. Trust me, your body will thank you!
Dress Appropriately
Choosing the Right Fabrics
Okay, let’s talk about what you’re wearing. When it comes to extreme heat, the right clothes can make a world of difference. I swear by light-colored and loose-fitting clothes. Dark colors absorb heat, which is the last thing you want when you’re trying to keep cool. Go for fabrics like cotton and linen; they’re breathable and allow your skin to ventilate.
A tip I picked up over the years is to avoid nylon and polyester. It’s tempting sometimes, but those fabrics trap heat and sweat against the skin, making it feel even hotter. Instead, I opt for materials that wick moisture away. This makes a significant difference in how comfortable I feel when the sun is blazing down.
Lastly, don’t forget about accessories! A wide-brimmed hat and sunglasses can protect your face and eyes from direct sunlight. I always keep my hat handy; it not only adds style but also saves me from roasting in the sun. A little preparation in your wardrobe can save a lot of discomfort!
Avoid Outdoor Activities during Peak Hours
Understanding Heat Patterns
I can’t emphasize this enough: timing is everything when it comes to outdoor activities in extreme heat. The sun is usually at its fiercest between 10 a.m. and 4 p.m. My rule of thumb is to plan my outdoor adventures around these peak hours. If you can, try to get your workout in early morning or later in the evening when the temperature cools down a bit.
By shifting your outdoor activities away from peak sun hours, you can reduce the risk of heat-related illnesses significantly. I’ve seen too many friends underestimate how harsh the midday sun can be, and they end up regretting it. Protecting your skin and staying cool should be your number one priority!
Instead, I often use those peak hours for indoor activities, maybe a gym session or tackling indoor chores. Plus, it’s a great way to stay productive while keeping cool. You’d be surprised how much you can get done in the comfort of your air-conditioned space!
Know the Signs of Heat-Related Illnesses
Recognizing Symptoms
Awareness is key! Understanding the signs of heat exhaustion or heat stroke can literally save your life or someone else’s. Symptoms like heavy sweating, weakness, dizziness, or nausea can be red flags that your body is overheating. I’ve had moments where I just brushed it off, thinking I’d be fine, but I learned the hard way that ignoring these signs can lead to more serious problems.
Heat stroke, in particular, is serious business. Symptoms include a high body temperature, confusion, or even loss of consciousness. If you see someone exhibiting these symptoms, get them to a cooler location immediately and call for medical help. Remember, it doesn’t hurt to be cautious when it comes to heat-related illnesses.
If you find yourself out in the heat, check in with your body regularly. I always ask myself if I’m feeling overheated or dizzy. Staying in tune with what your body is telling you can help you take action before things turn serious.
Stay Informed
Keeping Up with Weather Reports
The last piece of the puzzle is staying informed. I make it a point to check the weather reports regularly during the summer or anytime I know I’ll be exposed to extreme heat. Knowing how hot it’s going to get can help me plan my day better and adjust my activities accordingly.
Plus, if there are any heat advisories or warnings issued, I take them seriously. They’re not just there for decoration! The advice is often based on real risks, and it’s always better to be prepared. There’s no harm in double-checking the forecast before heading out.
I’ve also found social media and weather apps super helpful for real-time updates. If you’re planning an outdoor event, keep checking; it could mean the difference between a fun day and a scorching disaster.
FAQs
1. What should I do if I start feeling dizzy in the heat?
If you start feeling dizzy, it’s important to move to a cooler place immediately and sip on water. Lying down with your legs elevated can also help. Don’t push yourself, and seek medical attention if symptoms persist.
2. How can I keep my home cool without AC?
You can keep your home cool by closing curtains during the hottest parts of the day, using fans, and keeping windows open in the cooler evenings. Also, consider using a damp cloth or cooling towels.
3. Is it safe to exercise outside during hot weather?
It’s best to avoid exercising outside during peak sun hours. If you must, try to keep it short and take plenty of breaks in the shade or indoors. Hydrate well and listen to your body.
4. What are the symptoms of heat exhaustion?
Common symptoms include heavy sweating, weakness, fatigue, dizziness, and nausea. If you experience these, take action quickly to cool down and hydrate.
5. How can children and pets be kept safe in extreme heat?
Keep them indoors during peak heat hours, provide plenty of water, and ensure they have a cool place to rest. Never leave them in a parked car, even for a short time.
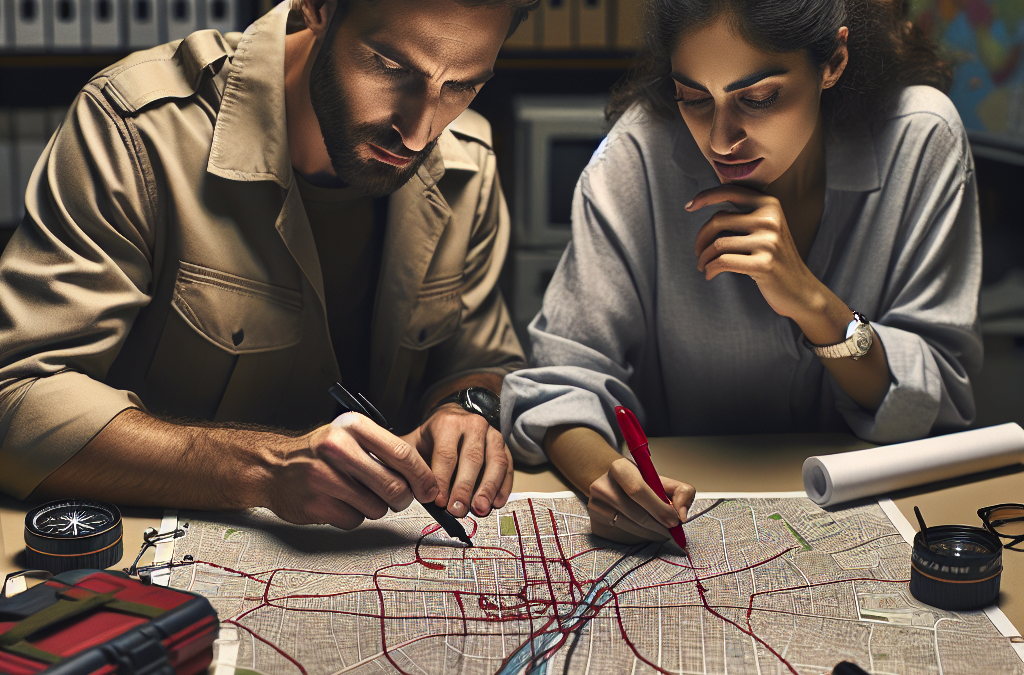
First thing’s first, understanding your surroundings is crucial. It’s not just about knowing the roads; it’s about being aware of the potential hazards around you. Whether it’s a natural disaster like a hurricane or a fire, knowing the layout of your neighborhood can save you heaps of time and stress when the need arises.
Take a stroll around your area. Identify main streets, alternative routes, and areas that could be potential choke points during an emergency situation. You might find shortcuts or hidden paths that could offer a safer escape route. Plus, familiarizing yourself with landmarks can also help you stay calm under pressure.
Map out these routes and keep them handy. Whether it’s an app on your phone or a good old-fashioned paper map, having a clear idea of your possible escape routes is vital to ensuring the best chance of a smooth evacuation.
Identify Safe Zones
Next, let’s talk about safe zones. Even if your primary route is blocked, it’s super important to know where you can go to find shelter or help. This could be a friend’s house, a community center, or even a designated evacuation point in your area.
Every neighborhood has those hidden gems. It could be a local school or a church that opens its doors for emergencies. Knowing these spots can give you peace of mind; if all else fails, you have a safe haven to escape to.
After identifying these safe zones, make sure to clarify how you can reach them from various points in your area. Having a plan not only reduces panic but also gives you that safety net, knowing you’re heading toward security and support instead of just running blind.
Consider Traffic Patterns
You’d think that when panic strikes, the last thing on our minds is traffic, right? But understanding traffic patterns can be revolutionary when planning your evacuation. During an emergency, everyone’s gonna be hitting the road at the same time, which can create massive gridlocks.
Spend some time observing traffic flow during different times of the day. Certain routes may be more congested during peak hours, and knowing this can help you to plan alternatives that could save your bacon in a crisis.
Also, don’t underestimate the power of local alerts. Many cities have apps or services that provide updates on road conditions and closures. Keeping tuned in can provide real-time information and help you dodge those pesky traffic jams.
Creating an Evacuation Plan
Outline Your Steps
Once you have your routes and safe zones mapped out, outlining your evacuation steps is next. To get started, think about what you need to pack in case of an evacuation. Essentials like food, water, and medicines should be prioritized in your plan.
Write these steps down and keep them visible. It might sound a bit old school, but having something physical to look at reduces the chances of forgetting something crucial while you’re in a scramble. Plus, it can be helpful for other family members or friends to know the plan, keeping everyone in the loop.
Practice makes perfect. Just like any kind of planning, running through your evacuation plan will help engrain it in your memory. Grab the family, do a quick rehearsal, and let everyone know what to expect. This will help alleviate any anxiety when the time comes to put that plan into action.
Communicate with Your Family or Group
Communication is key. Make sure that everyone involved knows the plan and the routes you’ve chosen. Use group chats or family meetings to ensure that everyone understands their tasks and roles during an evacuation. Trust me, it helps reduce confusion.
Designate a point person who can help coordinate actions and relay updates. While it’s important for everyone to be informed, having a central communicator can streamline efforts and make sure things run smoothly as nerves may start to fray.
Also, discuss emergency contact numbers and methods to stay in touch if you get separated. Having a fallback plan will ease worries for both you and your family in stressful situations. Just knowing that everyone has each other’s backs makes a massive difference!
Prepare an Emergency Kit
Next up, let’s chat about emergency kits. This is something I truly swear by when preparing for any unexpected situations. An emergency kit can be your lifesaver, so you want to make sure it’s stocked and accessible.
For starters, it should include essential items like water, non-perishable food, a flashlight, batteries, a first-aid kit, and emergency contact information. When packing the kit, think about your family’s specific needs—like medicines or baby supplies if you have little ones.
Don’t forget to routinely check your emergency kit and refresh its contents as needed! You wouldn’t want to reach for your supplies in a crisis only to find that the snacks are expired or it’s missing a flashlight. Keeping everything up to date is crucial!
Staying Informed During an Evacuation
Use Technology to Your Advantage
During an evacuation, information is power. Leveraging technology can give you a leg up on chaotic situations. There are some incredible apps out there, from weather alerts to emergency news updates that will keep you in the loop.
Having your phone charged and ready is vital. Make sure you have your emergency contact list and any apps that will help you navigate road conditions and alerts. Staying informed can help you make the best decisions on the fly, allowing you to dodge potential pitfalls.
Additionally, don’t forget the good ol’ radio. Sometimes, when all else fails, a battery-operated radio can keep you updated with the latest information when the power is out or cellular networks are jammed.
Monitor Local Agencies and News
Another key element is staying tuned to local agencies and news. It’s tempting to only watch national news, but local stations will provide specific details relevant to your area. They can give you information about the safety of roads, updates on emergencies, and any changes to shelter locations.
Follow local emergency service accounts on social media platforms for real-time updates. Many agencies are increasingly using these platforms to share essential information quickly, which can be a game changer during a crisis.
Consider also signing up for local alert systems where you can receive emergency messages directly to your phone. The more plugged in you are, the better prepared you’ll be to make quick decisions.
Keep an Eye on Weather Conditions
Never underestimate Mother Nature! Regularly checking the weather can help you gauge whether it’s best to hold tight or get moving. Apps and websites have made this super easy. You can track real-time weather updates right on your phone.
Pay special attention to forecasts and warnings. If a storm is rolling in, you’ll want to be on top of that, planning your route accordingly. Also, check for any changes in local travel conditions and road safety.
Prepare for the worst, but hope for the best! Having a backup plan based on changing weather conditions can often mean the difference between a smooth evacuation and a chaotic scramble.
Reviewing and Practicing Your Plan
Regularly Update Your Plans
Life changes, and so should your evacuation plan. Family structures might change, job situations might shift, or the neighborhood itself may evolve. Reviewing and updating your plans ensures that everyone’s needs are still met.
At least once a year, go over the plan as a family. Discuss any changes that might affect the original strategy, and take the time to adjust your routes and emergency kits as necessary. This proactive step saves you from being unprepared in the heat of the moment.
Engage everyone in this discussion. Keeping everyone involved fosters a sense of responsibility and unity in dealing with emergencies. Plus, it can be a fun exercise to explore new routes or decide on new safe zones together!
Conduct Drills
Practicing your evacuation plan may sound a bit over the top, but those drills can provide significant benefits. Conducting family evacuation drills allows everyone to understand their role, know the routes, and get acquainted with the emergency kit.
This drill doesn’t have to be elaborate; just doing a quick run-through can help. You can set a timer to simulate a sense of urgency. It can be surprising how practicing a simple routine can enhance your clarity and confidence during a real situation.
Not only does this create familiarity, but it also builds teamwork. As a family, you’ll learn to communicate and rely on each other, ensuring that the process feels less daunting when it really counts.
Review After Each Event
When calm is restored after an evacuation or drill, gather the family and talk about how things went. Reviewing your response after an event is crucial for improvement. What worked well? What didn’t? You can only improve on what you critique.
This review process can create a healthy discussion around fears, adjustments needed, and lessons learned, making it a bonding experience. Plus, it reinforces a culture of preparation that will serve your family best in future emergencies.
As time goes on, also encourage any new family members who join to participate and familiarize themselves with your evacuation plan. The more practiced you are as a family, the more confident you’ll feel!
FAQ
What should I include in my emergency kit?
Your emergency kit should include essentials like water, non-perishable food, a flashlight, extra batteries, a first-aid kit, personal medications, and a battery-operated radio. Don’t forget personal identification and important documents!
How often should I review my evacuation plan?
It’s best to review your plan at least once a year. However, any significant life changes or changes in your neighborhood might warrant an immediate review.
Can I rely solely on technology during an evacuation?
While technology can provide real-time updates, it’s crucial to have a backup system, like a battery-operated radio in case of power outages, as you can’t fully rely on tech during emergencies.
How can I ensure my family is ready for an evacuation?
Engage in conversations about the evacuation plan, conduct practice drills regularly, and ensure everyone knows their roles. Staying updated and involved fosters confidence and readiness in your family.
Why should I identify multiple routes for evacuation?
Identifying multiple routes prepares you for unforeseen circumstances, like road closures or congestion. Having alternatives can significantly reduce stress and time during an emergency.
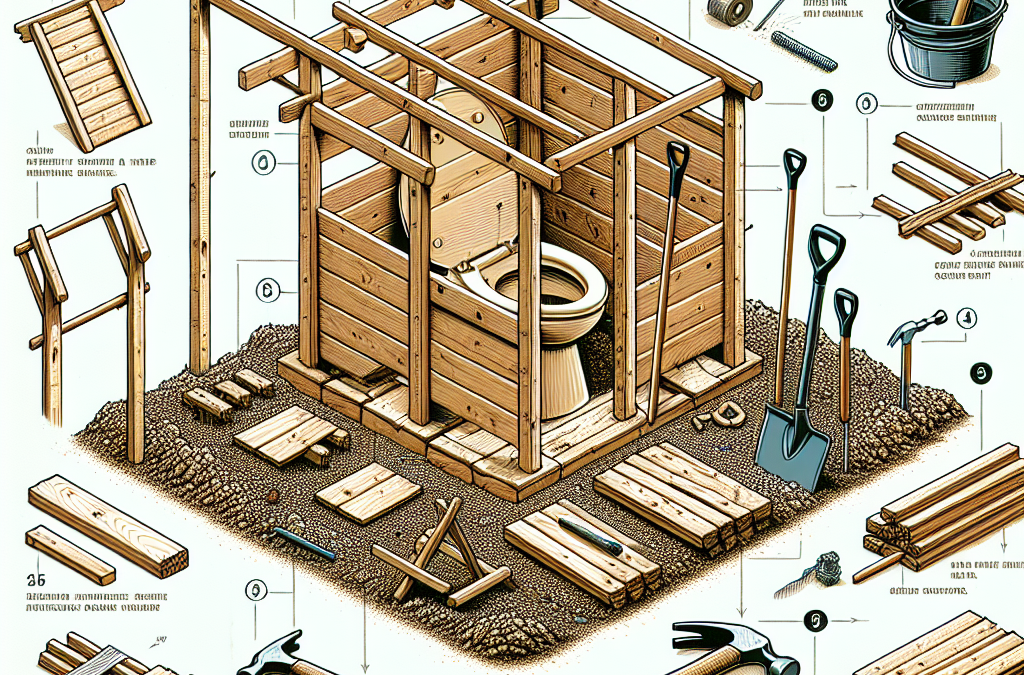
When it comes to building an outdoor toilet, the first step is picking the right location. I usually scout for a spot that’s remote enough to provide privacy yet close enough for convenience. Think about accessibility—especially for family gatherings or camping trips. You don’t want to trek miles just to use the loo!
It’s also essential to consider factors like drainage and wind direction. Placing the toilet downwind from your main living area can make a huge difference in comfort. And don’t forget about natural features like trees or bushes for added seclusion.
Lastly, I recommend checking with local regulations. Some areas have specific guidelines about distance from water sources or property lines. A little research here can save you from unwanted headaches down the line!
Planning for Waste Management
Next up on my list is how we’re going to handle waste. I’ve found that composting toilets are an effective option, especially if you’re keen on sustainability. They’re eco-friendly and can be surprisingly easy to maintain.
If composting isn’t your jam, check out traditional pit toilets. Just make sure the pit is deep enough (about 5 to 6 feet is ideal) and situated well to avoid contamination of groundwater. It’s all about making sure that what goes in, stays safe!
Another option I’ve considered is using a portable camping toilet. These can be a perfect solution for short-term needs and are usually much easier to set up and maintain, especially for the less handy among us!
Gathering Materials and Tools
Once I have a plan, the next step is gathering materials and tools. Trust me, nothing brings your project to a screeching halt like missing supplies. For the structure, I typically choose wood or durable plastic. If you’re feeling adventurous, you can also explore recycled materials!
As for tools, I’ve learned that having the basics like a saw, hammer, and measuring tape handy makes a world of difference during the build. I also recommend grabbing a shovel, especially if you’re digging a pit. And let’s not forget about nails and screws for assembly!
Gathering everything beforehand means you won’t need to make multiple trips to the store, which can definitely save time and sanity during the process.
Building the Structure
Constructing the Base
The base is where it all begins! I usually start with leveling the ground where the toilet will sit. This ensures that the whole structure is steady. I’ve made the mistake of skipping this step before—it didn’t end well!
Once I have a solid base, I construct a simple frame using treated lumber. This helps protect against rot and insect damage. I can’t tell you how many times I’ve wished I’d thought of this earlier in past projects!
Raising the base a bit off the ground also allows for better drainage and keeps things clean. I love a clean outdoor loo, don’t you?
Framing and Roofing
Next, I move on to framing the sides. I like to keep it simple—two-by-four studs are my go-to for strength and durability. Plus, they’re easy to nail together. It’s a quick way to get that classic cabin feel!
When I think about the roof, I often choose a slanted design. This helps with rain runoff and keeps everything dry inside. I’ve learned that a roof can make or break your outdoor toilet experience, so don’t skimp on this part!
Covering the roof with metal or shingles provides extra protection against the elements. After all, we want this toilet to last for years, right?
Finishing Touches
No outdoor toilet is complete without some finishing touches! I love adding a door for privacy. A simple latch is key here—it keeps everything secure, helping you to feel comfortable.
Don’t forget ventilation! Trust me, you’ll be grateful for this when the weather heats up. I usually install a small vent near the top of the structure. It helps keep odors at bay.
Finally, I like to decorate a bit—maybe some plants or a little sign to make it feel welcoming. It’s all about creating a space that’s functional yet inviting!
Maintaining Your Outdoor Toilet
Regular Cleaning
Now that the hard work is done, let’s talk maintenance. Regular cleaning is key. I like to set a schedule to keep mine fresh. A quick rinse down and a thorough scrub can work wonders. Plus, it’s so much easier than letting it linger!
I also recommend keeping cleaning supplies handy, like biodegradable soap and a scrub brush. That way, it’s a breeze to tackle messes when they happen. Nobody wants to deal with an overflowing toilet, right?
And while I’m at it, I often remind friends and family to keep it tidy after use. A friendly reminder goes a long way in maintenance!
Waste Management Practices
Depending on your waste management choice, regular checks are essential. For composting toilets, I like to monitor the composting process. It’s amazing how quickly waste breaks down! I make it a habit to turn the compost every once in a while to speed things up.
If you’re using a pit toilet, ensure that it doesn’t get too full. You might need to dig a new pit or cover the old one and start fresh after a few years. This is all part of ensuring a safe outdoor toilet that won’t contaminate your space!
Whatever system you choose, being proactive can make all the difference. Know your limits and don’t be afraid to reach out for help if needed!
Seasonal Considerations
Depending on where you live, I recommend adjusting maintenance routines seasonally. For instance, if you’re in an area with cold winters, insulating your outdoor toilet might be a good idea to protect against freezing.
Once the snow melts, don’t forget to check for any seasonal damage. Weather can be unpredictable, and a little inspection can help prevent bigger issues down the road.
In summer, I like to ensure good ventilation and keep the area around the toilet clear of debris. This can make a significant difference in keeping the space inviting and fresh!
FAQs
1. How do I choose the right location for my outdoor toilet?
Look for a private spot that’s accessible, away from any water sources, and downwind from your living area. Make sure it complies with local regulations too!
2. What materials do I need to build an outdoor toilet?
You’ll typically need wood for the structure, a shovel for digging, screws and nails for assembly, and some roofing material to keep it dry. Don’t forget about cleaning supplies!
3. How often should I clean my outdoor toilet?
I recommend cleaning it regularly—at least every couple of weeks or after heavy use. Be sure to have cleaning supplies and tools handy for easy maintenance!
4. Can I use an outdoor toilet year-round?
Yes, but you’ll want to consider weather conditions! Insulating it for winter and ensuring good ventilation for summer can help it last longer and remain comfortable.
5. What’s the best waste management system for an outdoor toilet?
It varies based on personal preference. Composting toilets are great for sustainability, while pit toilets can be efficient for longer-term setups. Choose what fits your needs best!
When disaster strikes, being prepared can make all the difference. Whether it’s a natural disaster, a power outage, or any unexpected crisis, having a well-thought-out emergency survival kit is crucial. But where do you start? Let’s dive into the essentials.
*Understanding the Basics: What Every Survival Kit Needs**
A solid emergency survival kit begins with the basics. At its core, it should contain enough supplies to sustain you and your family for at least 72 hours. This includes water—at least one gallon per person per day—and non-perishable food items like granola bars, canned goods, and dried fruits. Don’t forget about a manual can opener! Additionally, include personal hygiene items such as soap, toothpaste, and essential medications.
Another fundamental element is first aid supplies. A comprehensive first aid kit should encompass bandages, antiseptics, pain relievers, and any necessary prescription medications. Lastly, don’t overlook communication tools; a battery-powered or hand-crank radio ensures access to vital updates when power is out.
*Tailoring Your Kit: Consider Your Unique Needs and Environment**
Your emergency kit shouldn’t be one-size-fits-all; it should reflect your unique circumstances and environment. For instance, families with infants might need extra supplies like baby formula or diapers. If anyone in your household has specific medical needs—such as allergies or chronic conditions—make sure to include relevant medications and equipment.
Additionally, consider your geographical location. Those living in hurricane-prone areas may want to stock up on waterproof gear and more extensive water supplies than those in less affected regions. Take time to assess what specific risks you face based on your surroundings so that you can tailor your kit accordingly.
*Essential Supplies: Must-Have Items for Every Emergency**
While every kit will vary based on individual needs, there are certain must-have items that belong in every survival supply stash:
1. **Water purification tablets:** In case of an emergency water source.
2. **Multi-tool:** Versatile and handy for various tasks.
3. **Flashlights with extra batteries:** Essential for navigating in darkness.
4. **Blankets or sleeping bags:** Keep warm during cold nights.
5. **Whistle:** For signaling help if you’re stranded.
6. **Dust masks:** To filter contaminated air.
These basic supplies are just the tip of the iceberg but form the backbone of any effective emergency preparedness plan.
*Maintenance Matters: How to Keep Your Kit Ready for Action**
Creating an emergency survival kit is only half the battle; regular maintenance is key! Make it a habit to inspect your kit at least twice a year—ideally during daylight savings time changes—to replace expired food items and medicines and check that all equipment remains functional.
Also consider rotating seasonal items into your kit—extra thermal blankets in winter or sunblock in summer—to keep everything relevant year-round!
*Beyond Supplies: Developing a Comprehensive Emergency Plan**
Finally, remember that having physical supplies is only part of being prepared—it’s equally important to formulate an actionable emergency plan with your loved ones. Discuss escape routes from your home or neighborhood and establish meeting points where everyone can gather after an evacuation.
Don’t forget about communication! Ensure everyone knows how to reach each other during emergencies when cell towers may be down.
Being prepared means taking proactive steps today for peace of mind tomorrow… So get started on building that survival kit! You never know when it could save lives—or at least make tough situations much more manageable!
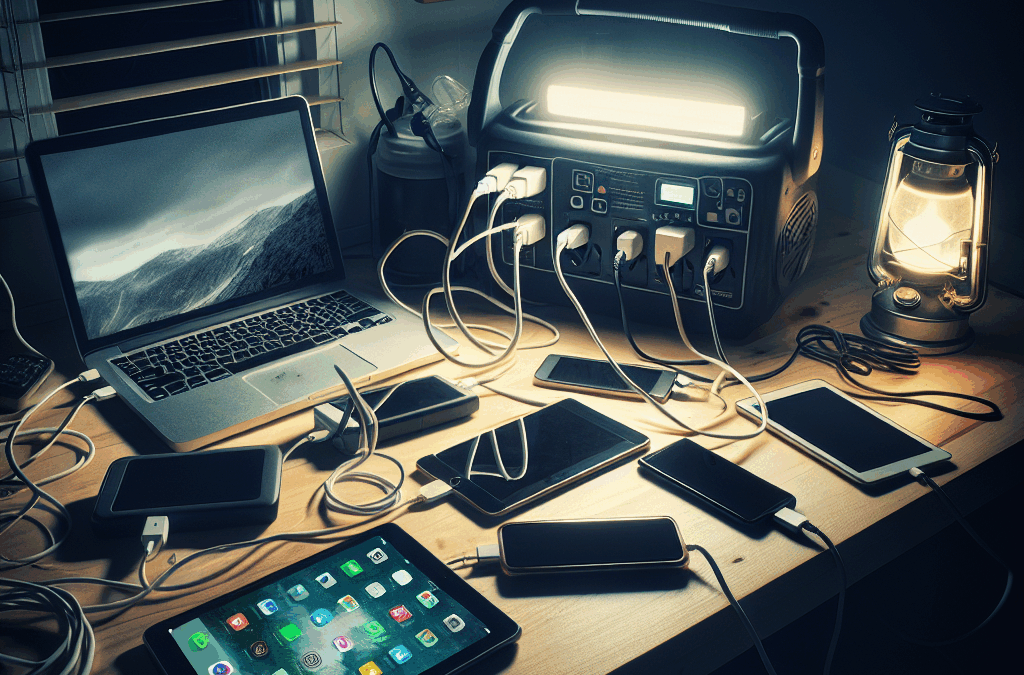
First things first, I’ve learned to take a good look at the gadgets I rely on. From my trusty smartphone to my laptop, figuring out which devices I can’t live without during a blackout is key. This helps me prioritize what needs charging the most, especially for those long power outages that leave us feeling cut off from the world.
I like to jot down the power requirements for each device. Most manufacturers list this info in the user manual or online—make sure to check it out! If I’m not careful here, I might be left scrambling to find a backup plan when the lights go out.
Also, consider factoring in the need for charging accessories, like power banks and chargers. Just because my laptop is at 100% doesn’t mean I can use it freely without ensuring my charger’s accessible and healthy! It’s all about prepping smart.
Battery Life Management
Once I’ve assessed my electronics, I focus on battery management. Reducing the usage of non-essential apps or turning down the screen brightness can stretch my device’s battery life significantly. When I know a blackout is looming, I often switch to battery saver modes to help prolong how long my devices last.
A vital move I’ve made is to turn off Bluetooth and Wi-Fi when I don’t need them. Even though these features are super handy, they can drain your battery like crazy if left on. It doesn’t hurt to be a bit old school sometimes—turning off notifications and closing unused apps really can help keep my devices alive longer when the power’s out.
I also make a habit of updating my apps and software regularly. Outdated apps might consume more energy than necessary, and I’ve learned it’s not worth the headache during an outage. Keeping things streamlined helps keep my battery life intact.
Choosing the Right Power Backup
Now, let’s talk power sources. I’ve done my share of research and learned that not all power banks are created equal. Depending on my device, I choose one that supports fast charging and has enough output to keep up with my electronics. I want to make sure that when the power flickers out, I have a reliable source ready.
Additionally, if you’re going for a generator, that’s a whole different game. I’ve personally found solar generators to be super helpful for longer outages. They’re eco-friendly and, if I have enough sunshine, they can be a game changer for keeping my devices working.
Ultimately, it’s all about having options. I keep a mix of portable chargers and a generator ready. You never know what can happen, and having various power solutions ensures I can stay connected or entertained, even when the grid goes down.
2. Preparing Your Charging Station
Creating an Accessible Setup
Setting up an efficient charging station is crucial when preparing for outages. I usually gather all my devices and their chargers in one place. This creates an easy-access hub that’s nearby when I need it most. It saves me from hunting around the house when I’m already dealing with chaos!
I like using a power strip with surge protection. This way, if the power returns with a jolt, my devices are still safe. Also, with multiple outlets, it keeps everything charged simultaneously. Besides, it gives me peace of mind knowing I can charge multiple devices if necessary.
Lastly, I label everything! This might sound a bit excessive, but trust me—when the stress hits, having things organized helps a ton. I even create a little chart with names and purposes for each cord. It seems silly, but you’ll thank yourself when the lights go out and you’re rushing to plug in your phone!
Stocking Up on Essentials
Charging during blackouts requires more than just a good setup; it means stocking up on essentials! I always make sure to have extra USB cables and adapters on hand. There’s nothing worse than realizing you’ve misplaced a key piece when you desperately need to charge your devices.
I also recommend having a backup battery or two. They’re not super expensive these days, and some even come with multiple USB outputs. This way, I can share the love with family or friends who may have forgotten to prepare!
Don’t forget about good ole’ batteries for any gadgets that require them. Keeping a solid stash around can help you avoid dead controllers, flashlights, or radios when the grid fails. It’s about thinking ahead and being about your devices, but also those around you.
Backup Plans for Extended Outages
Sometimes, a blackout can last longer than expected, and that’s when backup plans come into play. I’ve set aside some time to really consider what I would do if the power were out for several days. This includes everything from charging options to entertainment.
For entertainment, I load up my device with movies or eBooks, so even without power, I can still have options. It sounds silly, but I like keeping my spirits up during those times. Thank goodness for offline mode!
Another smart move? I keep a list of places nearby with Wi-Fi. Knowing where to go can make all the difference when things get tough. Whether it’s a friend’s house or a local café, it keeps me connected when the home front isn’t delivering.
3. Alternative Energy Solutions
Exploring Solar Options
In my quest to keep those electronics charged, I dove into solar energy options. Solar chargers have become increasingly popular, and let me tell you—they’re worth checking out! They harness sunlight to power up devices, which is fantastic on a sunny day.
When I first considered a solar charger, I made sure to research the most efficient types. Some fold out like a little panel, making them convenient to bring on camping trips or just stick in a bag. It’s good to explore and find what suits your lifestyle best!
Plus, they’re eco-friendly! It made me feel warm and fuzzy knowing I was contributing positively, even during an outage. It’s a win-win when I can recharge my devices and respect the environment at the same time.
Investing in a Portable Generator
Before I jump on the generator bandwagon, I did my research. I found that investing in a portable generator can be a solid choice for those who face frequent blackouts. It’s like having a little power plant right in my yard! Just plug it in, fire it up, and I’m back in business.
However, be mindful of the fuel type needed. I’ve learned that choosing one that can run on propane or gasoline is beneficial, depending on what’s available during an outage. It’s all about flexibility, people!
Ensure you follow safety guidelines when using generators. They produce carbon monoxide, so I’ve got a great little carbon monoxide detector nearby. It’s just smart to prioritize safety while keeping everything charged and good to go.
Using Wind and Other Renewable Sources
Though a bit of a wild card, wind and other renewable sources can also be fun to consider! While I haven’t fully embraced wind energy yet, I know others who’ve set up small wind turbines to harness that natural energy. It’s fascinating to see how creativity can lead to electrifying solutions!
Other methods I’ve heard about include using rechargeable batteries that can draw energy from various sources. They’re game changers when thinking long-term and charging multiple devices without relying heavily on traditional methods.
If wind or other sources interest you, dive in! Research your options and see what could work best. It’s all about embracing resourcefulness and keeping my electronics up and running during those blackout moments.
4. Connecting with Community Resources
Finding Local Charging Stations
I’ve learned that during a blackout, it’s super useful to harness community resources. Local hubs like libraries or community centers often have backup generators and can provide charging options during outages. Check your area for these resources!
It’s not only about finding a place to charge but also about connecting with your neighbors. Building relationships can turn into a support system during these blackout events. Trading charging time or even resources can lead to smoother sailing when the lights go out.
Don’t forget social media! Finding local groups or pages can help gather intel on where people are charging their devices. You might discover hidden gems in your town that could work as your go-to when the power dips.
Neighborhood Collaborations
Speaking of neighbors, I love collaborating with my community! We’ve started a little group to discuss blackout preparedness—everybody brings different gadgets or backup plans to the table. It’s been eye-opening to see the various methods everyone uses.
We also share resources like solar chargers or generators when the situation arises. If my gear is charged and your gear is low, a little lending can go a long way! This sense of collaboration helps us feel less isolated during power outages.
Plus, getting to know the folks next door over a cup of coffee while discussing backup options is also a highlight. It adds a sense of connection outside of just dealing with the blackouts—it’s about community and support!
Engaging Local Organizations
Another dynamic way to navigate power shortages is by engaging with local organizations. I’ve noticed that several non-profits focus on helping families prepare for emergencies. They provide workshops, distribute emergency supplies, and even offer charging stations during disasters.
These resources can be lifesavers in times of crisis. Getting to know these organizations has made me feel more connected. By participating in their events, I’ve also learned tips and tricks that I never even considered, boosting my preparedness.
If you haven’t already, take a look around your community and find out who’s out there. You’d be surprised at how many local organizations are geared up to help you out during tough times, all while fostering a sense of community along the way!
5. During the Blackout: Staying Charged
Implementing Smart Charging Practices
Once the blackout hits, it’s all about staying calm and using smart charging practices. My go-to is to prioritize charging my vital devices first, like my phone or portable wifi. These are my lifelines to the outside world, so I make sure they’re good to go.
Next, I start utilizing what I called ’emergency charging.’ If I need to keep an eye on important updates, I charge my phone for just a little while and power it back down until I need it again. This way, it can stretch out battery life and keep me in touch without consuming too much power.
During blackouts, I also find it helpful to limit the number of devices I charge at one time. It seems some happiness goes a long way when it comes to efficiency. Giving my devices a break from constant charging can really prolong their life and let me focus on what I need in the moment.
Staying Connected to Information
During a blackout, staying informed is crucial. I always make sure I have access to a battery-operated radio or an app that can work offline, so I don’t miss essential updates from local authorities. It’s a good way to stay in the loop without draining my phone right away.
Another fun trick? I keep a journal! Jotting down important info, notes about charging, or even just thoughts during blackouts can help me process things better. Staying mentally sharp is just as important when the world feels a bit chaotic.
Plus, engaging with apps that provide community alerts or local updates gives me peace of mind. Though I keep the screen down when I’m charging, a quick check-in can help make me feel more grounded.
Managing Stress and Emotions
Let’s be real, blackouts can be stressful. I’ve found that managing my emotions plays a significant role in staying proactive. During longer outages, I practice mindfulness and breathing techniques to keep calm and help refocus my thoughts. It’s all about creating a space of peace amidst the chaos.
I try to keep a positive mindset. It helps to make checklists or plans to get through it. I’ve learned that the more prepared I am, the less anxious I feel. Honestly, treating a blackout as an adventure rather than an inconvenience can help shift my perspective.
Lastly, I always prioritize engagement with family. Sometimes gathering around a candlelight dinner or playing card games during a blackout becomes a fun bonding experience. It’s about making the most of what I’ve got while creating cherished memories even in tough times!
FAQ Section
1. What should I charge first during a blackout?
It’s best to start with the devices you rely on the most, like your phone or portable wifi devices. They keep you connected to updates and family during an outage.
2. How do I extend my battery life during an outage?
Using battery saver modes, turning off unneeded apps and features, and lowering screen brightness can stretch your battery life a good bit!
3. Are solar chargers effective for keeping devices charged?
Absolutely! They can be really effective, especially on sunny days. Just ensure you get one suited for the devices you wish to charge.
4. What kind of backup resources should I consider?
Consider investing in a portable generator, keeping extra power banks, and using solar chargers. It’s always better to have multiple options!
5. How can I stay informed during a blackout?
Battery-operated radios are great, and keeping connected with apps that work offline can help you stay updated without draining your phones right away.
In today’s world, uncertainty lurks around every corner. Natural disasters, health emergencies, and unexpected events can strike without warning. Understanding the importance of emergency preparedness is crucial; it’s not just about survival but also about ensuring peace of mind for you and your loved ones. A well-structured emergency plan can make all the difference when chaos ensues.
To begin crafting your comprehensive strategy, start by assessing risks specific to your area. Every region has its unique threats—hurricanes in coastal towns, earthquakes on fault lines, or blizzards in northern climates. Research local hazards through government resources or community forums to get a clearer picture of what you might face. Knowing these potential threats enables you to tailor your emergency response appropriately.
Once you’ve identified the risks, it’s time to build the essential components of your emergency plan. Every effective plan should include clear roles for each family member and detailed procedures for various scenarios—whether it involves evacuating safely or sheltering in place during a storm. Establish meeting points both close to home and further away in case local conditions change drastically. Additionally, create an emergency contact list that includes friends and relatives who live outside your immediate area; they can serve as vital communication links if local networks fail.
Next up: building your emergency kit! This crucial step cannot be overlooked. Your kit should contain at least three days’ worth of supplies for each family member, including non-perishable food items, water (a gallon per person per day), first-aid supplies, flashlights with extra batteries, a multi-tool or knife, personal hygiene products, necessary medications, and important documents stored securely in a waterproof bag. Consider adding comfort items like blankets or books that may help ease anxiety during stressful times.
Communication strategies are also paramount when disaster strikes. In our technology-driven age, staying connected can be both a blessing and a curse. Ensure everyone knows how to reach each other by establishing primary and secondary communication methods—text messages often work better than calls during emergencies due to network overloads. Designate one out-of-state contact for all family members to check-in with as this can simplify coordination efforts when local systems are down.
However, creating an emergency plan is only half the battle; regularly reviewing and practicing it is key to staying prepared! Schedule periodic drills so everyone understands their roles instinctively when real situations arise. Practicing different scenarios helps build confidence among family members while reinforcing protocol adherence—after all, preparation transforms panic into proactive action.
Finally, don’t forget that preparedness is an ongoing process! Situations evolve over time—new threats emerge while personal circumstances change (like moving homes or welcoming new family members). Make it a habit to revisit your plan annually or after major life events.
In conclusion, being prepared goes beyond simply having supplies stashed away; it encompasses ongoing awareness and actionable strategies tailored specifically for you and those you care about most. So take charge today: assess risks in your area, develop an effective plan together with loved ones—and breathe easier knowing you’re ready whatever comes next!